|
Page 4
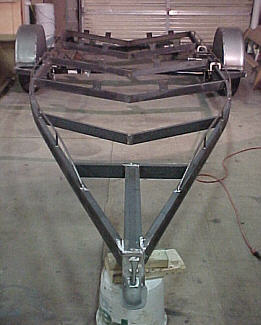
One reason for this is right now I have the axle fairly well forward to reduce the weight of the tongue will manhandling it around the shop. I think I will go ahead and buy the swiveling jack/wheel and bolt it on to make this easier. The other reason is I have no idea where it needs to set to properly balance the boat yielding the correct tongue weight. I realize this is why the undercarriage is moveable but still I need it somewhere in the ballpark but I haven't a clue. I guess I will worry about that later. The next project was to install the supports for the bunks. The book I have purchased from Glenn-L stressed that these need to be correctly positioned. Since many boats of this size spend the vast majority of their lives setting on the trailer improper fitting bunks could actually cause the bottom of the hull to distort which could reduce over all performance. Also, as they point out, the most abuse you will probably inflict on the hull will occur on the trailer.
I used 3" wide strips because I had previously determined that the maximum axle travel was less than up 3". The 2" x 4" bunks would raise the hull another 1½" but the skeg would hang down by the same amount. Also, because the hull is a little flatter "V" than the cross members the hull was actually about an inch higher at the keel so 3" up should be OK for the bottom of the bunk boards.
Next I measured to establish the position of the bunks. I wanted to place them under the battens as this is the flattest and strongest point on the hull. Because these are fairly narrow I decided to add another bunk on the outboard edges to increase the support. These may not have been necessary but having the hull rest on two bunks 24" apart just looked sort of scary to me.
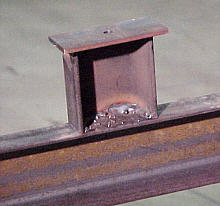
The plates on top of the support were added before I welded them
in place. The only reason for this was it was easier to weld them
up side down on the bench as opposed overhead on the trailer. I also
pre drilled the holes for the carriage bolts I plan to run through the
bunk boards to hold them in place.
|
 Things
are really starting to take shape now. I have the undercarriage completed
with the
Things
are really starting to take shape now. I have the undercarriage completed
with the 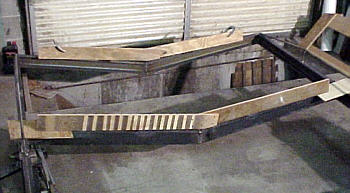 I
first measured the position of the trailers cross members and than transferred
these to the bottom of the hull. I then cut 3" wide strips of plywood
and
I
first measured the position of the trailers cross members and than transferred
these to the bottom of the hull. I then cut 3" wide strips of plywood
and  I
placed the forms on the frame using the center line mark to align with
the center of the cross members. I then realized that the #2 and #3 (from
the rear) were getting closer to the same angle as the cross members allowing
the hull to sit a littler lower than I liked. Because of this I shimmed
the second one a ¼" and the third a ½" just to be sure I
have adequate clearance.
I
placed the forms on the frame using the center line mark to align with
the center of the cross members. I then realized that the #2 and #3 (from
the rear) were getting closer to the same angle as the cross members allowing
the hull to sit a littler lower than I liked. Because of this I shimmed
the second one a ¼" and the third a ½" just to be sure I
have adequate clearance.
 With
the positions located it then cut the supports out of 3" channel. Using
the forms as a guide I could easily determine the correct angle for each
one of the pieces. This is where the band saw was really nice as
I could cleanly and accurately cut these. My first thought was to
just cut off straight pieces of the channel and weld them flat to the face
of the cross members. This would have worked fine and been much easier.
But I had the saw and had the time and do like the looks of the finished
support.
With
the positions located it then cut the supports out of 3" channel. Using
the forms as a guide I could easily determine the correct angle for each
one of the pieces. This is where the band saw was really nice as
I could cleanly and accurately cut these. My first thought was to
just cut off straight pieces of the channel and weld them flat to the face
of the cross members. This would have worked fine and been much easier.
But I had the saw and had the time and do like the looks of the finished
support.