|
PAGE 14
 Next
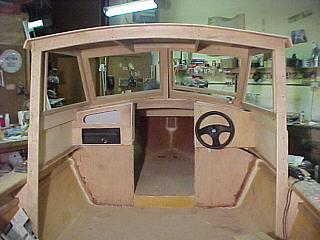
on my "things to build" list are the helm and storage boxes in the cabin.
I have to admit I like electronic gadgets so I wanted a little more instrument
panel area than the plans provide. I decided there was no reason not to
run it the full width between the berth entryway and the cabin wall.
This will allow me the space I need to mount the gauges I want. The list
include two 3 3/8" gauges - tach & speedometer and four 2 1/8" gauges
- fuel, voltage, trim and fuel flow. The Horizon Fuel Flow meter
is somewhat of a luxury but I am justifying it because of the scarcity
of fuel along the rivers I plan to cruise. It hopefully will allow
me to keep accurate track of my fuel burn. Next
on my "things to build" list are the helm and storage boxes in the cabin.
I have to admit I like electronic gadgets so I wanted a little more instrument
panel area than the plans provide. I decided there was no reason not to
run it the full width between the berth entryway and the cabin wall.
This will allow me the space I need to mount the gauges I want. The list
include two 3 3/8" gauges - tach & speedometer and four 2 1/8" gauges
- fuel, voltage, trim and fuel flow. The Horizon Fuel Flow meter
is somewhat of a luxury but I am justifying it because of the scarcity
of fuel along the rivers I plan to cruise. It hopefully will allow
me to keep accurate track of my fuel burn.
I also have a Eagle Fish ID 128 depth sounder and a handheld Eagle
Explorer GPS that I want to mount on top of the panel and a handheld VHF
radio I need to hang somewhere. This is a lot for a small panel but
I think I can get it to all fit.
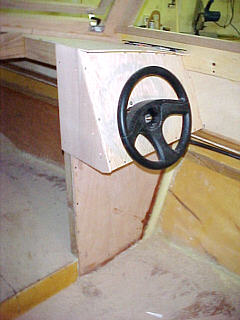 But
the first problem was to decide on the dimensions and height (from the
sole) of the panel. The minimum aft projection from the bulkhead is determined
by the steering system. In my situation (18 ft hull) I needed a 12'
cable and when it arrived I used it to set the location of the face of
the panel. I also wanted it slanted at a 20° angle. I should
have mentioned before that in preparation for building the panel (and glove
box on the other side) I had left the 1/4" plywood of the berth top long
enough to extend aft and form the top of the panel. But
the first problem was to decide on the dimensions and height (from the
sole) of the panel. The minimum aft projection from the bulkhead is determined
by the steering system. In my situation (18 ft hull) I needed a 12'
cable and when it arrived I used it to set the location of the face of
the panel. I also wanted it slanted at a 20° angle. I should
have mentioned before that in preparation for building the panel (and glove
box on the other side) I had left the 1/4" plywood of the berth top long
enough to extend aft and form the top of the panel.
To find the height of the center of the steering wheel I needed to
establish the seat height. One thing I have found when "winging it"
without the benefit of the plans is that you need to plan ahead and order
materials. In order to build the panel I needed to have the steering system
AND the seats. Also I needed to have a fairly good idea of
the gauges I wanted and any additional switches etc. I wanted to mount
on it. If I didn't have these I would have to wait until I obtained them
before I could proceed. It is aggravating to have to stop working
on an item and wait for parts to come in.
I placed the seat on a 5 gallon bucket and then used blocks to raise
it to the desired height. With this determined I was able to position the
wheel at a comfortable height. This is all a matter of personal taste and
will vary from builder to builder.
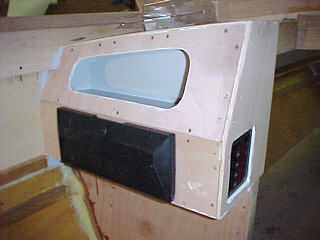 With
the helm in place I moved to the other side to build a structure for an
open storage area and a glove box. I wanted the same overall size with
the upper part at a matching 20° slant. The glove box was ordered
from "Overtons" and is an all plastic unit. I wasn't real thrilled
with the quality but it is serviceable. Above it is just an open shelf
to throw sunscreen and other miscellaneous stuff. If I was doing
it over I would make the opening a little smaller and higher to provide
a taller lip at the bottom to prevent items from bouncing out. It
will probably be OK as is but a little higher wouldn't have hurt. With
the helm in place I moved to the other side to build a structure for an
open storage area and a glove box. I wanted the same overall size with
the upper part at a matching 20° slant. The glove box was ordered
from "Overtons" and is an all plastic unit. I wasn't real thrilled
with the quality but it is serviceable. Above it is just an open shelf
to throw sunscreen and other miscellaneous stuff. If I was doing
it over I would make the opening a little smaller and higher to provide
a taller lip at the bottom to prevent items from bouncing out. It
will probably be OK as is but a little higher wouldn't have hurt.
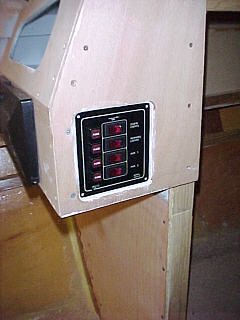
In the side of this structure I mounted a four switch/fuse panel.
I really would have liked this on the helm side but there just wasn't room.
Also, I plan to have a double door arrangement for entering the berth.
These will be hinged along the sides and open out flush to the sides of
the instrument panel and storage unit. Because of this I had to recess
the switch panel into the plywood.
 Although
the instrument panel and storage area don't really look like much it took
many hours to lay them out and build them. Every piece is rough cut
and then recut (sometimes SEVERAL times) to get a decent fit in the shape
I wanted. Behind every plywood joint there is a 1" X 1" cleat for
support. I am glad I took the time to make these but still it did
take a lot longer than you would think. Although
the instrument panel and storage area don't really look like much it took
many hours to lay them out and build them. Every piece is rough cut
and then recut (sometimes SEVERAL times) to get a decent fit in the shape
I wanted. Behind every plywood joint there is a 1" X 1" cleat for
support. I am glad I took the time to make these but still it did
take a lot longer than you would think.
Next
Back
Home
|