The exterior of my Cabin Skiff was painted with Easypoxy. This is a one part polyurethane paint that delivers a very high gloss. It has almost a "plastic" look when dry and most people will mistake it for fiberglass gel coat. The paint can be applied by spraying, roller or brush. I have a good spray gun and have painted numerous items with it but I am far from proficient. Plus to me the CS was going to be a challenge to paint. For one, trying to spray up under the drip edge of the cabin top would be tough to do without getting runs. The advertisements claim that a decent finish can be obtained with using a combination of roller and brush. I had my doubts but decided to give it a try. What I found was yes, you can get a really nice finish with the roller/brush BUT you must use the correct technique. Unfortunately finding it was a matter of trial an error. Pettit's paint techs had given me a brief description of the method - apply the paint to a small area with a roller. Then use a brush to "top" or strike it off by dragging the bristles lightly over the wet paint. This will smooth out the bumps and bubbles left by the roller and the paint will flow to hide the brush marks. Sound easy doesn't it! Actually it is on horizontal surfaces. Roll it on and top it of and it will flow out to a beautiful smooth surface that looks as good as sprayed. But try the same method on a vertical surface and I can almost guarantee that you will have sags and runs - I sure did! Although it is a little harder you can obtain good results on the vertical surfaces. The problem is that you must be very careful not to deliver too much paint. First use the shortest nap roller you can find. I used a 3/16 foam roller I found at the local home supply store. It came in 12" size but I preferred to cut them down to 7". The larger size would probably work but I personally feel the smaller roller is easier to handle. Remember you are not trying to put on a lot of paint - in fact just the opposite. Pour a small amount of pain in the pan. Normally with latex paint you just stick the roller in it, roll it back and forth a time or two to spread it on the roller and then apply. Don't do this with Easypoxy. Here the object is to get just a small amount of paint on one side of the roller and then spread it around by rolling it back and forth on the upper portion of the pan. You need to get paint all the way around the roller but do it with as little paint as possible. With a new roller I usually roll it on the pan 15 or 20 times. I know this sounds like over kill but you MUST get it on the roller even and thin.
Holding the brush at about a 45 degree angle to the surface quickly and lightly run the tips over the paint in HORIZONTAL strokes. This should remove most all the bubbles. Then repeat the striking off of the paint only this time make the strokes VERTICAL. This is very important. Be sure to always finish with vertical strokes. I don't know why but if you finish with horizontal strokes the paint will tend to sag along the lines where the bristles of the brush were pulled through the paint. In my first coat I had sags all over. They formed horizontal lines that looked like rows of waves on the water. I had to do a lot of sanding to correct the mess. Once I changed and finished with VERTICAL strokes I didn't have a single sag.
Also, you must work fast. As I mentioned before you only have a minute or so before it stops flowing well. If you take too long it will start to dry and you will be able to see the edges of each section. This is because they won't flow together - paint is then too thick! Because of this once you start painting an area you must finish it. You can't paint half way down the hull and stop for a coffee (or pee) break. When you start again you will see the line where you stopped. The paint will still cover correctly - just look bad. So to sum it up - Roll the paint on a small area as absolutely thin as possible. Use vertical and horizontal strokes with the roller to even out the paint. Then top it of with a natural bristle brush finishing with VERTICAL strokes. Work fast and over lap the sections. It may sound difficult but it is not. In a few minutes you
will get the feel of things and it will go very quickly. If you have a
helper you might try having them roll on the paint while you strike it
off. Jut don't let them get too far ahead of you. Paint used - UPDATE
In January of 2006 I decided to repaint Therapy. A more detailed narrative of that project can be read here but I thought I would add a few thoughts about the project.
First don’t use too fine a grit sandpaper when sanding the primer. I used an automotive lacquer based primer and sanded with 220 sandpaper. I feel this is too fine for Easypoxy and provided less than optimal adhesion. Not that any of the paint has flaked off on its own but if scrapped hard it will separate living the smooth primer below.
Best bet is to use Pettit’s White Undercoater (6149) but allow plenty of time for it to dry. At 60 degrees 24 hours after application it still clogged 150 sandpaper. At 36 hours after application it sanded fairly well.
Using an inexpensive air brush and the White Undercoater thinned with Pettit’s Old Salem spraying thinner (121) worked well for spotting in small damaged areas.
When applying the paint I still find it beneficial to finish the tipping off with a vertical stroke. But I also discovered the choice of rollers can make a huge improvement in reducing sags and runs. When I first painted Therapy I used a 3/16 thick foam (dark gray in color) roller purchased at a local lumberyard. It worked but I spent an inordinate amount of time working the roller in the pan to even out and minimize the amount of paint it was carrying to the surface. 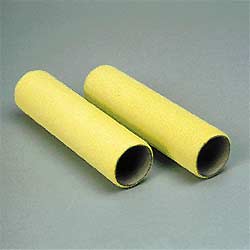
This time I decided to try a foam roller manufactured by West Systems for applying epoxy - #800 roller covers. The foam on this 7” roller (I cut them down to 3”) is thinner than the others and it tends to absorb much less paint. As a result, it is much easier to apply the very thin layer of paint needed. Very little working of the roller in the tray is necessary. I highly recommend using them. It will greatly speed up the time needed to apply each section allowing you to maintain the needed wet edge.
One final item – while applying Easypoxy can keep you busy, once you understand the process it doesn’t require much mental capacity. As a result, while repainting Therapy my mind began to wander and I found myself questioning why it makes a difference to finish the tipping off with vertical strokes. After some thought on the subject I believe I have a plausible explanation.
Although it is quite fluid while being applied, the purpose of coating with paint is to provide a solid covering. So think of it as a solid. In fact, lets think of it as the building blocks we played with as a child. We are going to attach the blocks to the side of the hull just above the spray rail. We want to cover the entire hull side with the blocks but leave a thin space, let say 1/4” between each row. The glue we are going to use if somewhat thin like Titebond (yellow glue).
If we start applying the blocks in horizontal rows we find that the first row goes on fine as the spray rail helps hold them in place. But when we start the next row and leave the ¼" space we quickly discover they tend to slide down. The wet glue doesn’t have enough “bite” to hold them in place and gravity takes over causing them to sag. Even if we get the second row to stay in place when we add the third row some of those blocks slide down hitting the second row causing it to slide down to the first.
So we change strategy and start again but this time stack the blocks in vertical columns. Now the block below helps support the block above. We aren’t totally dependent on the slippery glue to hold them in place and we can stack them to the top of the hull with no sag. The space between the columns makes no difference.
Now we aren’t covering the hull with blocks but when the brush is used to horizontally tip off the wet paint it is indeed dividing it in to small rows with the bristles leaving tiny spaces between. This space allows the unsupported paint to shift downward where it hits the next row causing it to move downward - a chain reaction better known as a run or sag. But go vertical and the columns of paint tend to help support itself and defeat gravity.
As I have said before I am no expert but in my mind this explanation seems logical.
|
 Once the roller is coated
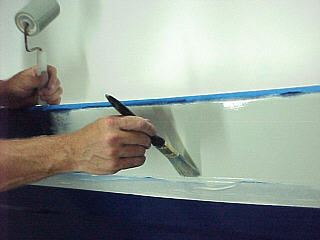
apply it to the surface. Work in small sections. When painting the side of
the CS's hull I started at the transom and worked forward. I
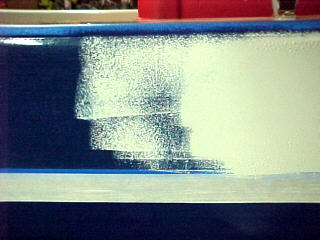
rolled on an area about 12" wide and height of the side - about 2 to
2 1/2 feet. Try to feather the outboard edge (see picture).
Although the paint takes several hours to dry to the touch you have only a
few minutes before it starts sticking to the brush and will no longer
"flow" well. I like the 7" roller because it allows me to make
smaller sections. When applying the paint use the roller both up and down
and sideways to try to spread it even and thin as possible. Once
smoothed out there will be bubbles left by the foam roller. In fact
you can use these to judge you application as the bubbles should be
uniform in size. If they are larger in one area the paint is heavier
there - roll it some more!
Once the roller is coated
apply it to the surface. Work in small sections. When painting the side of
the CS's hull I started at the transom and worked forward. I
rolled on an area about 12" wide and height of the side - about 2 to
2 1/2 feet. Try to feather the outboard edge (see picture).
Although the paint takes several hours to dry to the touch you have only a
few minutes before it starts sticking to the brush and will no longer
"flow" well. I like the 7" roller because it allows me to make
smaller sections. When applying the paint use the roller both up and down
and sideways to try to spread it even and thin as possible. Once
smoothed out there will be bubbles left by the foam roller. In fact
you can use these to judge you application as the bubbles should be
uniform in size. If they are larger in one area the paint is heavier
there - roll it some more!
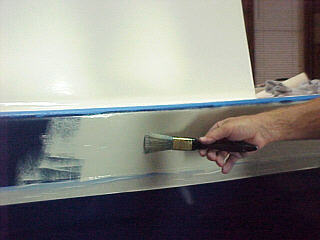 With the paint applied you
now need to top it of with a brush. Be careful with your selection
of brushes. Do not use polyester fibers. Even though many of
these are designed for oil based paint I found that after a minute or so
the tips would begin to melt and leave what looks like dust in the
finish. Use only "natural bristle" brushes. I like the ones
with the frayed tips (tips are lighter in color and finer than main
bristle). As for size I used a 3 inch and a 1 inch.
With the paint applied you
now need to top it of with a brush. Be careful with your selection
of brushes. Do not use polyester fibers. Even though many of
these are designed for oil based paint I found that after a minute or so
the tips would begin to melt and leave what looks like dust in the
finish. Use only "natural bristle" brushes. I like the ones
with the frayed tips (tips are lighter in color and finer than main
bristle). As for size I used a 3 inch and a 1 inch.
 When you apply paint onto the next
section overlap the last section by an inch or two. Make you
horizontal strokes with the brush. Start with the tips on the brush
on the dry unpainted side and drag it across the wet paint and lift it off
as it runs through the overlapped area. This allows the two sections to
"flow" together.
When you apply paint onto the next
section overlap the last section by an inch or two. Make you
horizontal strokes with the brush. Start with the tips on the brush
on the dry unpainted side and drag it across the wet paint and lift it off
as it runs through the overlapped area. This allows the two sections to
"flow" together.