|
After putting it off for a whole season, I decide roll her in the shop through my NEW 10’ X 10’ garage door (wouldn’t quite fit through my old 9’ wide & 7’ tall door) and tackle the problem of an almost total repaint. I really wasn’t looking forward to the project as I new it would involve one of my least favorite things – sanding! But alas, that is part of the process and if I was to have a shiny new looking toy I would have to yield to the abrasive demons.
The first assignment was to remove all the protruding appendages that had been bolted, screwed or otherwise attached to the exterior surfaces. Hatches, handrails, cleats, rub rails, rub strakes, Nav lights, radar unit, windshields, drip rail, horn, outboard cover, rope holders and more. I couldn’t believe how much “stuff” there was to remove! I bought a box of zip-lock sandwich bags and used them to keep fasteners and items together to simplify assembly. It took a whole day just to remove hardware.
There were a few items I decided not to remove, as it would be much easier just to mask them off. They included the fuel fillers, VHF antenna, bow eye and the forward hatch in the berth top. Early on using Therapy I had trouble getting it to seal well and had a minor leak. Took it off twice before getting it right. It has been leak free since and decided to let well enough alone. But somewhat to my dismay this Bomar white plastic framed hatch has “yellowed” with age. I wanted to try to paint it so I drove out the hinge pins and removed just the top leaving the frame sealed in place.
I decided to start on the pilothouse top. When I removed the handrails from the top it had pulled off some of the paint leaving the primer exposed. And this brings me to another problem. One negative factor I had noted with the paint was that it didn’t seem to bond as well as I thought it should to the primer. BUT please don’t blame the paint. If you read my earlier entries about painting you know I substituted a lacquer based automotive primer in place of the suggested Pettit White Undercoater. I had problems trying to sand the Pettit product and out of frustration made the substitution. This may be causing the problem.
But another possible explanation (and more likely in my estimation) is that I over-sanded the primer. Pettit suggest sanding their primer with 150 grit. The lacquer based called out 320 grit but I used 220. This well might have caused too slick a surface with minimal “teeth” for the Easypoxy to grab – hence a less than perfect bond. Live and learn.
So now I needed to feather edge the pulled paint areas so I could repaint. But what I found was the Easypoxy didn’t feather edge. It seemed to sand well at first but when it became a thin layer it would just chip of the primer and leave a hard edge. I don’t mean big chips but rather tiny ones right along the edge. It looked fine but running a finger across I could feel it. And I knew it would show.
A call to Pettit brought a solution. They suggested I feather edge it as best I could with “100 grit” paper and then use their White Undercoater (duh) to fill the hard edge. Then sand the Undercoater down with 150 grit and paint. They said the 100 grit would allow enough bite for the primer to adhere well to both the old primer and the paint on top. Worked like a charm. I used an airbrush to spray the primer on the damage areas. Sanding the Undercoater next day did cause some paper clogging problems but the areas were small so the problem was minimized.
With the top prepped and ready for paint it was now time to address two other problems. The first was on the deck over the bow. There is a seam of two plywood sheets screwed to the strongback (see photos on this page Week 7). This joint was covered with just the final layer of 6 oz fiberglass cloth. After a year or so it developed a hairline crack between the two sheets running about 8” long. It stopped there and has not grown since. Also the centerline post between the windshields had developed a similar crack. But here there was no glass just the painted white oak.
I had decided I would just have to suck it up and take the punishment and bought epoxy to do the job. All was fine until the day I was set to mix that magic stuff together. And I choked! I just couldn’t bring myself to do it. I remembered the insane itch of my hands. My eye lids drying out and cracking and bleeding. The red swollen blotches on my face. I just couldn’t do it. I thought of having someone else apply it for me but still there would be the sanding that would contaminate my shop again (below freezing outside)and the fumes off gassing from the repair. No, just couldn’t do it!
After some soul searching I decided to once again break the rules and do what many advise against – I used polyester resin over epoxy. Actually just over epoxy on the bow as the windshield post was bear wood. Will it work out - Good Question. But I reasoned if it doesn’t it is a small area on the bow (about 6” X 16”) and I will grind it off and not be any worse off than now. I did make one concession. I didn’t actually use polyester but rather vinyl ester. Better than polyester but sure not epoxy either. Again – time will tell.
I had also decided to compromise on a “total” repaint. The gray 6” stripe just below the rubrail was in good shape. In order to do it too I would have to remove registration numbers and the state sticker. Trying to get another set of stickers from the Illinois Department of Conservation would probably consume more time than the total paint job! Not worth the effort. Also the transom would require some serious equipment removal as well as the loss of the custom printed “THERAPY” moniker. There wasn’t a scratch on the transom so again I didn’t feel it was needed.
A major project was getting the boat “CLEAN”. Removing all the sanding dust would be a job in an ideal location but in my shop it is almost an impossible dream. I started by blowing it off with compressed air and using the shops 36” exhaust fan to expel the cloud. The next day after the dust settled I then used the shop vac to get the worst of what was left. Then I used a dry rag to wipe off even more – taking it outside frequently and blowing it off with compressed air. Then used a rag dampened with Pettit Old Salem thinner to wipe it again. AND THEN used a tack cloth right before I applied the paint. Still wasn’t perfect but close enough for me.
I used the roller and tip method and am still amazed how the Easypoxy flows out to an extremely high gloss finish (see photo to the right). I have had many people look at Therapy close up and everyone thinks it is a fiberglass boat. This is not because of my skill as a builder but rather the unbelievable smooth gloss finish of the paint. When I tell them it is plywood they are shocked. When they ask about the finish and I tell them I just rolled it on (a little exaggeration but not much) they look at me like I’m nuts. For the amateur builder I personally feel this paint is hard to beat. I haven’t tried Interlux’s Brightside but I assume because of it’s popularity is very similar
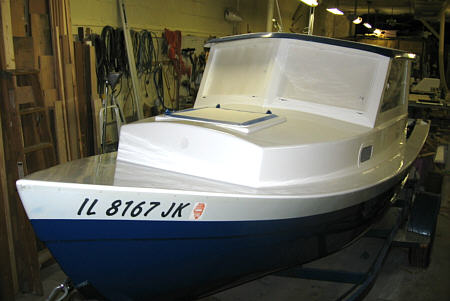
Above is a photo as I pull her out of the shop. Overall it wasn't a bad project. In fact, even with all the sanding it was still enjoyable watching Therapy returning to the bright clean new look she had five years ago.
|
 After
five years and over 20,000 miles Therapy’s paint was starting to look a
little wore. This was NOT a problem with the paint itself but
rather a combination of dock rash, miscalculations and a few just dumb
errors. The EasyPoxy still maintained much of its extremely
high gloss that requires next to no maintenance. I have been
very pleased with the paint and under normal use I feel it would have
lasted for years more but note Therapy is kept on the dry and under
roof when not in use. I am sure this is a big help.
After
five years and over 20,000 miles Therapy’s paint was starting to look a
little wore. This was NOT a problem with the paint itself but
rather a combination of dock rash, miscalculations and a few just dumb
errors. The EasyPoxy still maintained much of its extremely
high gloss that requires next to no maintenance. I have been
very pleased with the paint and under normal use I feel it would have
lasted for years more but note Therapy is kept on the dry and under
roof when not in use. I am sure this is a big help. The
final step before beginning the surface prep was to use some stick on
carpet protector sheeting (bought at Home Depot) to cover all the
carpet. I also taped a sheet of plastic across the aft
pilothouse opening to try to keep most of the dust out.
The
final step before beginning the surface prep was to use some stick on
carpet protector sheeting (bought at Home Depot) to cover all the
carpet. I also taped a sheet of plastic across the aft
pilothouse opening to try to keep most of the dust out.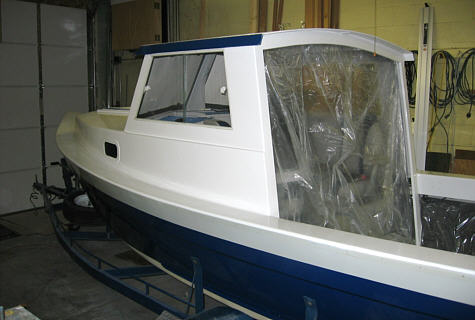 Ok,
no big deal. I’ll just spray on some more lacquer primer and
sand it out smoothing the edge. WRONG! The thinner
on the primer would lift the edge of the paint and make it crinkle.
(Oh, I guess that’s why you don’t mix products when you don’t know what
your doing!!) Now what?
Ok,
no big deal. I’ll just spray on some more lacquer primer and
sand it out smoothing the edge. WRONG! The thinner
on the primer would lift the edge of the paint and make it crinkle.
(Oh, I guess that’s why you don’t mix products when you don’t know what
your doing!!) Now what? I
wanted to address these two items but doing so created a real dilemma
for me. The proper repair would be to sand these down and use
epoxy to add glass tape reinforcement over the joint and fill and
paint. No big deal, again – right? But for me EPOXY
is a four-letter word. Actually, I love the stuff but it
hates me. My allergic reaction is sever and ugly.
I
wanted to address these two items but doing so created a real dilemma
for me. The proper repair would be to sand these down and use
epoxy to add glass tape reinforcement over the joint and fill and
paint. No big deal, again – right? But for me EPOXY
is a four-letter word. Actually, I love the stuff but it
hates me. My allergic reaction is sever and ugly. There
were a few other minor dings to be filled but then it was time to let
the sanding begin. It really wasn’t bad. Working
the two glass patches down were the worst of it. Although
sanding the entire boat took some time it wasn’t hard. The
Easypoxy sanded well with 150 grit but did tend to clog the
paper. To clean the paper I used a wire brush made to clean
metal hand files and it would usually pop them off with little hassle
(the rubber eraser type cleaner helped but wouldn’t get the stubborn
clogs). I used a 1/4 sheet oscillating sander, an orbital
sander as well as hand sanding.
There
were a few other minor dings to be filled but then it was time to let
the sanding begin. It really wasn’t bad. Working
the two glass patches down were the worst of it. Although
sanding the entire boat took some time it wasn’t hard. The
Easypoxy sanded well with 150 grit but did tend to clog the
paper. To clean the paper I used a wire brush made to clean
metal hand files and it would usually pop them off with little hassle
(the rubber eraser type cleaner helped but wouldn’t get the stubborn
clogs). I used a 1/4 sheet oscillating sander, an orbital
sander as well as hand sanding. The
painting itself went well. Holding my shop at 60 degrees I did the
first coat of white on a Saturday afternoon. It was dry to
the touch in about 4 to 5 hours. The next morning I came in and lightly
hand sand it with 220 grit paper (no clogging) and applied the second
coat that afternoon. The next day it was ready to
go. I did the blue sides using the same procedure the
following weekend.
The
painting itself went well. Holding my shop at 60 degrees I did the
first coat of white on a Saturday afternoon. It was dry to
the touch in about 4 to 5 hours. The next morning I came in and lightly
hand sand it with 220 grit paper (no clogging) and applied the second
coat that afternoon. The next day it was ready to
go. I did the blue sides using the same procedure the
following weekend.