|
“The
Gathering” of 2007 was approaching and I was planning to attend but had a
problem. For the past year or so I have been a little ashamed of my
trailer. It has been a beast of burden transporting Therapy for thousands
of miles yet receiving little in the way of TLC. Sure, I repacked the
wheel bearings and kept the lights functional but that was about it. As
the seven years have past since new hydrated iron oxide
(Fe2O3.nH2O) has slowly made an
appearance in various locations. Yes, that’s cancer of everything steel –
RUST. I need to clarify that only a small part of this was due to actual
wear and tear of highway use. There were some rusting rock chips on the
fenders and the forward faces of cross members but those alone were not
enough to warrant a total repaint. Where the
real problem existed was in the bunk mounts. In retrospect this was caused
by a design flaw I created in mounting the carpet covered bunk boards to
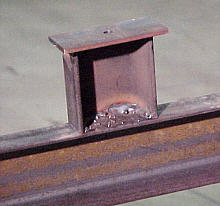
the frame. As can be seen in the photo below I cut spacers of 3” channel,
which I welded on edge to the frame.
On top of those I welded a flat 3/16” thick plate with a hole
drilled for the galvanized carriage, which attached the treated bunk
board. They looked very clean and were extremely
strong.
BUT – they
rusted horribly. The main reason was the carpet on the board stayed wet a
long time trapping water on the mostly horizontal flat plate. This allowed
the paint to soften and rust to get a foothold. And they were bad. Rust
was flaking off in layers as the entire channel spacer was infected and
the corrosion was spreading to the frame member. Also, the bolts holding
the bunks were more than half rusted through. (Early on in the trailers
life I had a similar problem with carpet-covered steps fore and aft of the
fenders). I knew I
would need to completely remove the bunk mounts and careful use of a
cutting torch would make quick work of the extraction but the question was
how to replace them and prevent the reoccurrence of the problem. After
considerable thought my very inventive mind came up with a brilliant
solution – go look at factory trailers and see how they handled the
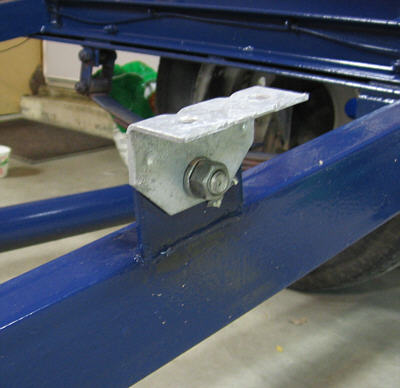
problem. Here in the Midwest the vast majority of boat trailers are built from steel. With the absence of salt water, a properly primed and painted trailer will afford reasonably good service. Roller trailers are a rarity and most all of them have carpet covered wood bunks. I conducted several recon missions at boat ramps and the information gleaned was enlightening. What I discovered was the common use of galvanized “L” brackets to attach the bunk boards. They then were bolted to the upright welded steel tab attached to the frame. A photo will make this easier to visualize.
The beauty
of this arrangement is the wet carpet stays against the galvanized surface
while the attach point between the tab and the galvanized bracket is
vertical. This allows water between the two to run down and not contact
the painted surface long enough to allow damage to the
paint. With this
information I went about removing my spacers and replacing them with
vertical tabs. Before I cut off the old ones I carefully measured and
recorded the height of each spacer. The challenge here was to make the
tabs and drill the hole in each at the correct height so the top of the
bracket matched the height of the original spacer and therefore support
the bunks at the necessary level.
The galvanized brackets are a fairly common trailer item and I
ordered mine from Champion Trailer. With the
tabs drilled and installed it was time to address the finish. I had
originally painted it with commercial type enamel paint. Its performance
had been fair but I decided to look for something better. I wanted a paint
more water resistant so I went looking for one with an epoxy-base. What I
finally decided to use was the one part ArmorPoxy. At about $70 a
gallon it was more expensive than most common enamel paints but it was
advertised as waterproof, flexible and durable. Just what a trailer
needs. One concern
was the reported “dry to the touch” time of 24 hours. I was going to be
painting outdoors at my wooded home site during the summer. If it stayed
tacky for 24 hours it could end up looking like fly paper in a cattle
barn. Another concern was a couple of post I had read on forums
complaining that after the suggested seven day wait for a hard cure the
paint lifted from garage floors when water was allowed to stand. Not a
good sign. Still, the manufacture’s description sounded like the product I
wanted to use and I decided to take a
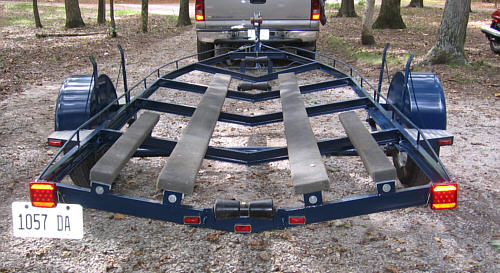
chance. Existing rust on the frame was removed both mechanically (wire brushing) and chemically a rust converter. Another reason I liked the paint was no primer was required. Once the prep was complete I sprayed on two coats of the Armorpoxy. It sprayed well and developed a nice deep gloss. Much to my surprise, I found it dried to the touch in a little over an hour so no major insect problem developed.
Once painted
I rolled it into the garage and allowed it to stay there for eight days.
During that time I installed the bunks and new LED lights that hopefully
will put and end to bulb replacement. On the ninth
day I rolled it outside to work on something else I the garage. That
afternoon while I was gone for a couple hours we had a light rain shower.
When I went to look at the trailer I was shocked to see wherever water was
standing on the paint it had changed color becoming much lighter. The moisture was very noticeably
affecting it. I rolled it
back into the garage and wiped off all the water. Not a good sign. The
next morning the color changes were gone and the paint seemed
undamaged. I allowed it to set in the dry for another eight days. During that time I decided to roll it back under Therapy and lower the boat down on the bunks. In the process I became over exuberant and managed to push the trailer into one of the stacks of concrete blocks supporting Therapy and broke one of the new LED taillights! Another $50 added to the project.
Finally,
after about two and a half weeks, with Therapy on the bunks I backed it
down the ramp into the water.
When I returned from my short run water was still standing on the
trailer but no discoloration was visible. And since that time I have noted
none. I have to assume that
although the tack time was shorter than advertised the hard cure time was
longer. Only time will tell if it was a good choice of paint but so far I
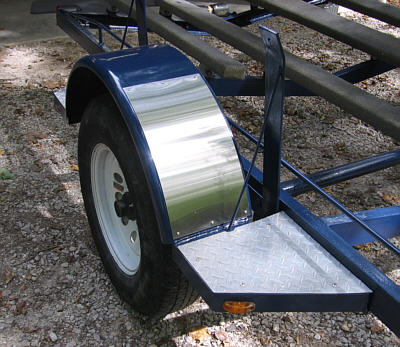
am pleased. Also, I had
some thin sheets of stainless steel squirreled away in the shop and I
attached them to the front fenders as rock guards. I wish they covered a
little more of the top of the fender but that is what I had. Still, I
think they give a nice appearance. All in all it came out well and looks new again. I made the trip to “The Gathering” and no one was the wiser that just a month before the trailer looked like &%$#@&! Like Bill E says - There can be no miracle recoveries without first screwing up.
|


