Trailer Update
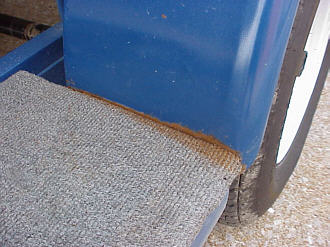
When building the trailer I made the steps in front and behind the fenders out of treated plywood and covered them with scraps of indoor/outdoor carpet left from the interior. This was inexpensive and look nice too. But I have now learned that it was a mistake. When backed into the water the carpet naturally gets wet. The problem is that it stays wet. And resting against the steel frame below and the fender at the side eventually it softens the paint and allows rust to start forming (see photo). Obviously this is not acceptable and I decided that the carpet had to go. I considered a couple of different materials to make the step but the one I liked the most was sheet aluminum tread. I found it at either Home Depot or Lowes (can’t remember which) and bought a piece that was large enough to cut out the four steps. These have worked very well and I should have done this in the beginning. I had looked at it when building the trailer but the cost seemed a little excessive. If I remember correctly it was almost $50 for the 2’ X 2’ sheet.
I finally decided to try something although I had little faith it would work. I bought some clear “contact paper” at the local hardware store. This is the roll of plastic that has adhesive on one side and is used mainly to line shelves. My first thought was that it really wouldn’t provide much protection plus it would probably fall off the first time it was submerged. The glue on the back is designed with a mild tack so it can be removed if needed. But what the heck, it was cheap and took about 3 minutes to install. Amazingly it as worked extremely well. It must add just enough cushion to prevent the paint from chipping when hit. Plus it has stayed in place without as much as a loose corner. It does give a “dull” look to the area where it is applied (see photo #2) but still much better than having rusty chips all over. Every once in a while taking the cheap way out does work!
After doing some measuring and dry fitting, I decided that there was room between the frame members below the bow. I used ¼” x 2” flat steel to make a “T” shaped assembly and bolted it to the trailer. I had to bend the steel to allow the spare to sit low enough to clear the bow but only a couple of inches drop was needed.
All in all I have been very pleased with the trailer. I have towed the Cabin Skiff at speeds up to 75 MPH with no problems. It tracks straight with no tendency to sway. The sealed lights have worked flawlessly and proved to be well worth the few extra dollars of building cost. I never take the time to unplug then when loading or unloading - I just back in with them on. I’ve done it for more than a year now with out a single bulb failure.
|
 After a year of use there
were a couple on modifications I decided were needed to my trailer.
I still need to lower the fenders as they look kind of funny sitting that
high but I just haven’t taken the time to cut them off and reweld 3 inches
lower. Another problem with the fender has developed though.
After a year of use there
were a couple on modifications I decided were needed to my trailer.
I still need to lower the fenders as they look kind of funny sitting that
high but I just haven’t taken the time to cut them off and reweld 3 inches
lower. Another problem with the fender has developed though.
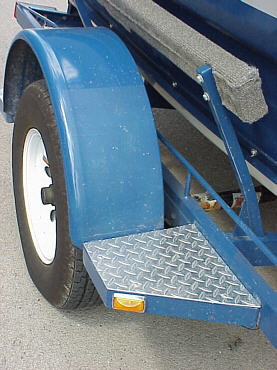 Another problem I had
found with the finders is that they are prone to rock chips which also
start to rust quickly because of the regular bath they receive. At
first I had some thin blue plastic I thought I would attach to the forward
sides to serve as a shield. It would have covered it nicely but
after seeing what the carpet had done I was afraid that water would be
trapped behind it and cause more rust problems.
Another problem I had
found with the finders is that they are prone to rock chips which also
start to rust quickly because of the regular bath they receive. At
first I had some thin blue plastic I thought I would attach to the forward
sides to serve as a shield. It would have covered it nicely but
after seeing what the carpet had done I was afraid that water would be
trapped behind it and cause more rust problems.
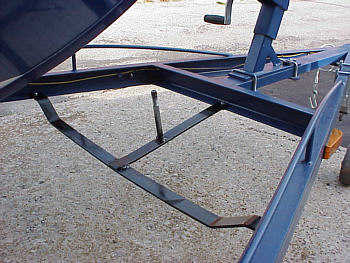 Another trailer
modification was to add a carrier for a spare tire. In my haste to
complete the project I had omitted this. Actually, until I had the
boat on the trailer I really didn’t know where I could best position it so
I decided to wait. I had originally planned to purchase a clamp on
unit that would hold the tire in an upright position near the bow.
But the more I look at it the less I liked it.
Another trailer
modification was to add a carrier for a spare tire. In my haste to
complete the project I had omitted this. Actually, until I had the
boat on the trailer I really didn’t know where I could best position it so
I decided to wait. I had originally planned to purchase a clamp on
unit that would hold the tire in an upright position near the bow.
But the more I look at it the less I liked it.
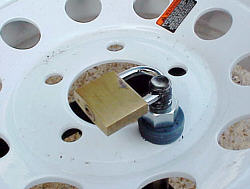 To hold the tire in place
I use a 5/8” x 6” bolt with the head welded to the carrier. I made a
plastic washer out of scrap I had sitting around to protect the painted
steel wheel from being scratched. A common nut was then used to
squeeze the tire firmly in place. Before I welded the bolt on the carrier
I drilled a hole near the end to accommodate a padlock. Not exactly
theft proof but maybe enough to persuade a potential thief to look
elsewhere.
To hold the tire in place
I use a 5/8” x 6” bolt with the head welded to the carrier. I made a
plastic washer out of scrap I had sitting around to protect the painted
steel wheel from being scratched. A common nut was then used to
squeeze the tire firmly in place. Before I welded the bolt on the carrier
I drilled a hole near the end to accommodate a padlock. Not exactly
theft proof but maybe enough to persuade a potential thief to look
elsewhere.
 If you are thinking about
building your trailer, in my opinion Glen-L’s plans certainly can provide
a blueprint for success.
If you are thinking about
building your trailer, in my opinion Glen-L’s plans certainly can provide
a blueprint for success.