|
Building the Trailer
Page 2
 Now
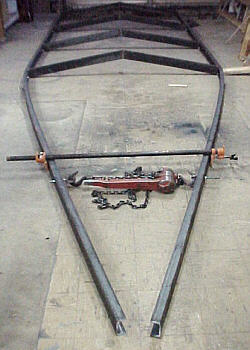
it is time to bend the rails to meet in the middle where the coupling will
attach. To accomplish this I borrowed a chain comealong (sp?) from
the machine shop. I really wasn't sure how much force would be needed to
accomplish this squeeze and as it turned out it wasn't bad at all. What
if you don't have a friend that has all this kind of stuff you can borrow
- for less than $20 you can buy a small cable comealong at most home centers
that will do the job. (The pipe clamp was added after I pulled them together
because I really wasn't sure about the possibility of it springing back
if something came loose. The thought was that it would hold it in position.
I bit of insurance but may not have been necessary.) Now
it is time to bend the rails to meet in the middle where the coupling will
attach. To accomplish this I borrowed a chain comealong (sp?) from
the machine shop. I really wasn't sure how much force would be needed to
accomplish this squeeze and as it turned out it wasn't bad at all. What
if you don't have a friend that has all this kind of stuff you can borrow
- for less than $20 you can buy a small cable comealong at most home centers
that will do the job. (The pipe clamp was added after I pulled them together
because I really wasn't sure about the possibility of it springing back
if something came loose. The thought was that it would hold it in position.
I bit of insurance but may not have been necessary.)
To attach the comealong I drilled a 3/8" hole
in each side rail. Next I took a 3/8 bolt and welded a large washer
to the head making a ring for the hook to attach (see
photo). I then just used the comealong to pull the ends until
they met.
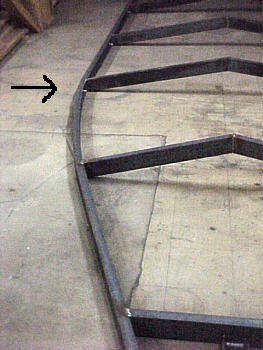
This was a mistake! If you look at the photo
above you will see that almost all the bending took place just in front
of the most forward cross member. This in itself is not a problem
but it stressed the cross member so much it actually bent it backwards.
(See photo). I used the comealong tied
to the front of the rails to pull it back straight.
 I
then used a length of 2 x 4 placed between the rails about a foot in front
of the cross member and pulled it together again. I then moved forward
about a foot again and pulled it again. This caused the outside rails
to make a more gentle bend and did not distort the forward cross member.
Plus I liked the look better to boot. You can see the difference
in the photo to the right. (The "original" forward cross member is indicated
by the arrow as two more were added by the time this photo was taken.) I
then used a length of 2 x 4 placed between the rails about a foot in front
of the cross member and pulled it together again. I then moved forward
about a foot again and pulled it again. This caused the outside rails
to make a more gentle bend and did not distort the forward cross member.
Plus I liked the look better to boot. You can see the difference
in the photo to the right. (The "original" forward cross member is indicated
by the arrow as two more were added by the time this photo was taken.)
Once this was accomplished the other two cross
braces were added. The very front one is straight but the other needed
to have the same 5" raise the others had. Because the outside ends were
closer it required the angles to be different than the others. It
came out to about 13 to 14 degrees here where the others were 10.
 With
these in place all that was left was to add the center member for mounting
the coupler. The plans show an alternative for using a 50 degree
coupler that would tie the side rails and center together but I decided
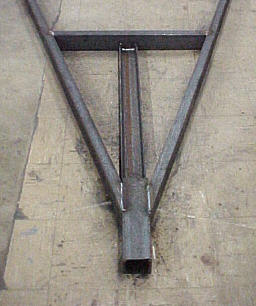
on the straight 3" coupler. Many trailers use 2 1/2" or 3" square
tubing for this but I didn't have it on hand. I decided to just cut
a 12" piece if the channel and weld it flange to flange to form a tube.
This may not have been necessary but provides more surface on which to
weld the coupling. A better close-up of this
can be seen here. Remember the frame is lying upside down. With
these in place all that was left was to add the center member for mounting
the coupler. The plans show an alternative for using a 50 degree
coupler that would tie the side rails and center together but I decided
on the straight 3" coupler. Many trailers use 2 1/2" or 3" square
tubing for this but I didn't have it on hand. I decided to just cut
a 12" piece if the channel and weld it flange to flange to form a tube.
This may not have been necessary but provides more surface on which to
weld the coupling. A better close-up of this
can be seen here. Remember the frame is lying upside down.
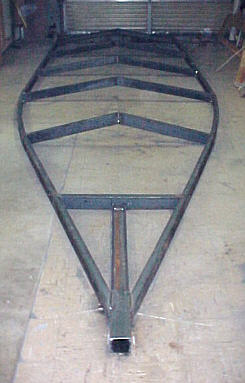
Below is a view of the entire frame.
At this point I am ready for the axle and have ordered it from a
local trailer supplier. They have straight axles in stock but I wanted
to use a 4" drop type. This will place the bunks a little closer
to the water and help on shallow ramps. They have the drop axles custom
made to your dimensions but it takes about 3 weeks to get them. Mine
should be in the about a week so things will be on hold until then.
 An
option that was available on the axle was "Sure-Lube" hubs and spindles.
The spindle (the axle stub where the bearings ride) are drilled down the
center and a grease fitting is screwed into the end. Between the
rear bearing and seal it is crossed drilled to form a passage for the grease.
The idea is that you remove a 1" rubber plug in the hub cap, insert the
grease gun and pump grease through the spindle. It comes out behind
the rear bearing and is then forced back forward. In the process
it repacks the bearing and forces any water out. This is suppose
to eliminate having to repack the wheel bearings! An
option that was available on the axle was "Sure-Lube" hubs and spindles.
The spindle (the axle stub where the bearings ride) are drilled down the
center and a grease fitting is screwed into the end. Between the
rear bearing and seal it is crossed drilled to form a passage for the grease.
The idea is that you remove a 1" rubber plug in the hub cap, insert the
grease gun and pump grease through the spindle. It comes out behind
the rear bearing and is then forced back forward. In the process
it repacks the bearing and forces any water out. This is suppose
to eliminate having to repack the wheel bearings!
I love owning boats but I do hate repacking
wheel bearings. And when you have two boats on trailers (soon to
be three with the Cabin Skiff) it becomes an all afternoon project.
And a messy one at that. The cost for the option was $15 - less than
a pair of "Bearing Buddies". If it works as advertised I will be
all smiles!
BACK
NEXT HOME
|
 Now
it is time to bend the rails to meet in the middle where the coupling will
attach. To accomplish this I borrowed a chain comealong (sp?) from
the machine shop. I really wasn't sure how much force would be needed to
accomplish this squeeze and as it turned out it wasn't bad at all. What
if you don't have a friend that has all this kind of stuff you can borrow
- for less than $20 you can buy a small cable comealong at most home centers
that will do the job. (The pipe clamp was added after I pulled them together
because I really wasn't sure about the possibility of it springing back
if something came loose. The thought was that it would hold it in position.
I bit of insurance but may not have been necessary.)
 I
then used a length of 2 x 4 placed between the rails about a foot in front
of the cross member and pulled it together again. I then moved forward
about a foot again and pulled it again. This caused the outside rails
to make a more gentle bend and did not distort the forward cross member.
Plus I liked the look better to boot. You can see the difference
in the photo to the right. (The "original" forward cross member is indicated
by the arrow as two more were added by the time this photo was taken.)
 With
these in place all that was left was to add the center member for mounting
the coupler. The plans show an alternative for using a 50 degree
coupler that would tie the side rails and center together but I decided
on the straight 3" coupler. Many trailers use 2 1/2" or 3" square
tubing for this but I didn't have it on hand. I decided to just cut
a 12" piece if the channel and weld it flange to flange to form a tube.
This may not have been necessary but provides more surface on which to
weld the coupling. A better
  An
option that was available on the axle was "Sure-Lube" hubs and spindles.
The spindle (the axle stub where the bearings ride) are drilled down the
center and a grease fitting is screwed into the end. Between the
rear bearing and seal it is crossed drilled to form a passage for the grease.
The idea is that you remove a 1" rubber plug in the hub cap, insert the
grease gun and pump grease through the spindle. It comes out behind
the rear bearing and is then forced back forward. In the process
it repacks the bearing and forces any water out. This is suppose
to eliminate having to repack the wheel bearings!