 Thanksgiving
Day 1999 marks my first whole month working on the Cabin Skiff and a building
routine has more or less evolved. I don't keep heat in my shop all
the time. It is an older brick structure with no insulation and high
heating bills would be hard to justify. Fortunately it has been a
very mild fall and the temperature is holding at about 60 degrees. Unfortunately
this is too cool for the epoxy. Because of this I have been spending
my free evenings working on the project but limit the task to cutting and
pre drilling parts and assemblies. Then early Saturday morning
I fire the heat and spend weekend gluing and encapsulating. Has been
working well. Thanksgiving
Day 1999 marks my first whole month working on the Cabin Skiff and a building
routine has more or less evolved. I don't keep heat in my shop all
the time. It is an older brick structure with no insulation and high
heating bills would be hard to justify. Fortunately it has been a
very mild fall and the temperature is holding at about 60 degrees. Unfortunately
this is too cool for the epoxy. Because of this I have been spending
my free evenings working on the project but limit the task to cutting and
pre drilling parts and assemblies. Then early Saturday morning
I fire the heat and spend weekend gluing and encapsulating. Has been
working well.
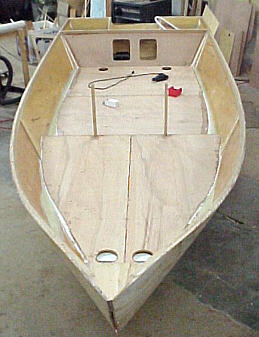
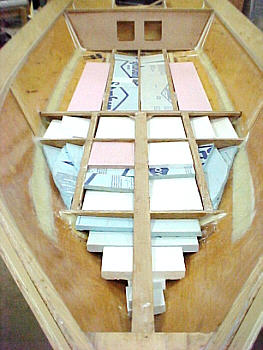
I was to the point I was ready to install the flat and the sole. But first, I scrounged around the shop and came up with enough scrap foam sheets to place under them for floatation. I like the idea of using the foam in blocks and sheets as it still allows air space for ventilation and water escape. I also used a can of foam insulation to "spot glue" some of the pieces together. Once done I checked one more time that everything was coated with at least two coats of epoxy. With every thing covered I set the flat and sole in the resin putty and nailed in place. Until this time the hull was still quite flexible but once the decks cured in place the entire structure became quite rigid. Also you will note the two 1 x 1 3/4" uprights attached to the partial bulkhead. These will form part of the door jams to enter the berth and are not according to the plans. I had decided to omit the step thru hole in the cabin flat. As result, these uprights needed to be installed before the flat as they attach to the back of the partial bulkhead and the long beams. But if cut and installed to the full height turning the hull over would be quite a chore. I decided to cut them short and will use a second 1 x 1 3/4 to back them up as a doubler.
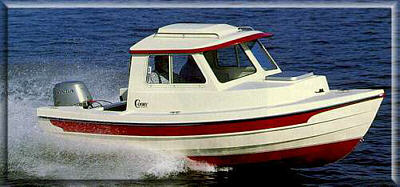
This photo also shows the bulwarks temporally installed for fitting and drilling (done during the week when the shop is cool). This is an area were I have decided to make a major change in the design. For better or worse I have chosen to move the decks up from sitting on the inner sheer to have them sitting on the upper sheer. Also, instead of the cabin side walls being straight as in the plans, I want then to curve and follow the contour of the upper sheer leaving a constant 7 inch ledge for the decks. This IS a major change. I have given this a lot of consideration and THINK I can get it all to work. Although it will give the cabin 6" more height on the sides (overall height won't change) that's not why I am doing it. The reason for this change is purely aesthetics. In looking for a design to build I ran into a factory craft called the C-Dory. I really liked the looks of the boat and checking it's dimensions showed it to be almost identical to the CS. I have decided to modify the CS to make it look as similar as practical.
Unfortunately my building is going to be slowed down for a couple of weeks. I have a bunch of real work ($$$) that I need to complete. But by mid December I should be able to hit it hard again. ************************************ Photo #6 - The aft bulkhead epoxied in place Photo #7 - Uprights for berth doorway. Photo #8 - View of built in fuel tank. Two very wet layers of fiberglass cloth has been applied to sides and bottom. I plan to lightly sand and wipe them down. Then pre heat the surfaces and epoxy and apply another coat of thin (because of the heat) epoxy to be sure all pin holes are filled. Photo #9 - Before and after photos of the
holes drilled to drain any water accumulation from out board the longbeams.
A 4" inspection cover will be installed.
|
 I
had hoped to accomplish a little more over the long weekend but managed
to run myself out of epoxy. I was warned by another builder that
I would use A LOT more epoxy than the 3.5 gallon that came with the Stitch
& Glue kit and it is proving correct. So far I have used 5 1/2 gallon!
I got the sole and flat were in place but I still need to add the fillets
and fiberglass tapes. Since this will be much easier without the
bulwarks installed (see next paragraph) I decided to wait for the epoxy
shield.
I
had hoped to accomplish a little more over the long weekend but managed
to run myself out of epoxy. I was warned by another builder that
I would use A LOT more epoxy than the 3.5 gallon that came with the Stitch
& Glue kit and it is proving correct. So far I have used 5 1/2 gallon!
I got the sole and flat were in place but I still need to add the fillets
and fiberglass tapes. Since this will be much easier without the
bulwarks installed (see next paragraph) I decided to wait for the epoxy
shield.
 But
it will create a bunch of extra work. The plans will guide me as to how
he structure should be built but none of the sizes will be correct.
I am really going to have to roll my own for the rest of the project.