 At
this point I am three weeks in to the project and all is going well.
Still, the modifications are consuming a lot of "think" and layout time. At
this point I am three weeks in to the project and all is going well.
Still, the modifications are consuming a lot of "think" and layout time.
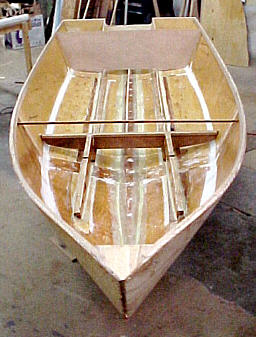
The main reason I lengthened the CS 2 ft was for fuel storage. To provide for this I also have moved the aft bulkhead forward 6". The result of this is to increase the storage area under the aft decks. Here I plan to build-in fuel tanks (one on each side). These will be made by fiberglassing the lower 12 inches of each outside bay between the transom and aft bulkhead and should provide me with 15 gallon on each side. The tanks will be connected by a 3/4" ID section of fuel hose running through the knee. This should allow the use on just one fuel fill and one fuel gauge sending unit as gravity should keep the levels in each side equal. The 8" or so above the fuel tanks will be used as semi-dry storage for ropes, bumpers, ect. I checked with Glen-L about the fuel resistance of Epoxy Shield and they stated that they really weren't sure if it was fuel proof. Because of this I decided to go to Wicks Aircraft in Highland, IL and purchase the epoxy for lining the tanks. I had used their PR3660 epoxy before for fuel tanks on a homebuilt airplane and knew it would withstand gasoline.
The photo to the left shows the transom area with the aft bulkhead fitted and temporarily installed. The knee is also just sitting there to make sure everything fits and has not yet had the center cut out. Building so far has not been difficult. Everything is fairly well covered on the plans but may take a little looking to locate. I will mention again that I found the video on building the Console Skiff very helpful as it is often nice to be able to "see" how the various parts are built and come together. Because of this I have decided to post additional of pictures of my progress as they may help others as their building progresses. But to speed up the loading of the web pages I will list a description of the photo and link to the actual picture. This way if you want to see it you can but if you don't you won't be forced to wait while it loads. I will still place a few on the main pages to make it more interesting. ********************************************************** Photo 1 - View of the longbeams from the bow looking aft. Photo 2 - View of the longbeams from transom looking forward. Photo 3 - View of bresthook. Note that cutout for strong back has been omitted because of another planned modification. Photo 4 - Close-up view of bresthook. I added an additional block (end cut at angle) under the inner sheer for better support of the bresthook. Photo 5 - View of aft bulkhead and transom
area.
|