|
Until I took a trip down the Green River in Kentucky I had not ever had to use fuel that contained ethanol. There is one filling station in my hometown that still sells alcohol free gas and I always fill up there when operating local. When away from home I have added fuel at marinas but they have always told me their fuel contains no alcohol. But while on the Green River trip I was forced to buy 5 gallons of gasohol and dump it in the empty tank. Knowing the situation I immediately switched to that tank and ran it out in the next 3 hours. I assumed that being in the tank for short of time would cause no problems to the “alcohol proof” sealer I had applied. About two weeks later while cruising down my home river the Honda 50 sputtered and then quit. I acted just like it was out of gas but I knew I had over a half a tank onboard. I noticed that the clear fuel filter in the line right before it enters the outboard was empty. When I looked closed I noticed that the primer bulb was sucked flat. Obviously, I had a blockage in the fuel line somewhere. The way I have the two tank system plumbed is quite simple. I have a line leading from each tank with a quick connector (Suzuki/Chrysler type) installed on the end. When I run one tank dry I just disconnect from one and on to the other – pump the bulb a time or two and I’m on my way. I went ahead and disconnected from the tank and the bulb popped back to normal. I then removed the quick connector and blew down into the tank figuring that would dislodge and obstruction. I didn’t notice any resistance but that didn’t surprise me. If something had just blocked the end of my pickup tube a few bubbles would easily move away – at least temporarily.
Once home I opened the tank expecting the worst and my expectations weren’t denied. I found that the sealer was peeling off in quite a few places and fragments swimming around in the bottom of the tank. “Alcohol Proof Sealer” – yea, right…….. Interestingly I open up the other tank and it was pristine – no deterioration noticed anywhere. So there was no questioning my mind as what had caused the problem. After a few choice words I began to come back to reality and face the problem at hand. What was gong to be the best way to solve the problem? Obviously, I was going to need to drop some type of new tank into the existing area of the old tanks. This would entail cutting the top out of the old tank and hopefully dropping a new one in its place. The problem was that I really didn’t want to cut out any visible structure and go through the encapsulating and painting procedure again. This left me with a 16” x 14” opening to drop in a tank. Plus it is an odd shape as the hull tapers in making the 16” width only 13” at the bottom. My dream solution was to find a plastic tank that would drop in place. I spent hours searching the web and catalogs and found none that were even close. I then looked for prefabricated metal tanks but again came up empty. This left me but one choice – custom-built tanks. The next question was do I have someone make them for me or do I attempt it myself? Honestly, I am a serious do-it-yourselfer so I preferred to take on the project but there were a couple of considerations. There are basically two types of metal to use – steel or aluminum. Both have advantages and disadvantages. Steel is heaver and more prone to corrosion. Aluminum is more difficult to weld and more costly. At first I leaned towards the steel. I knew I could easily handle the welding of the thin steel. I wouldn’t use my MIG but gas weld instead. I am quite proficient at it. I figured I could paint the exterior with epoxy paint, which should prove durable. Also, I ran the numbers on the weight and was surprised that the steel tank would only weigh about 4 pounds more than one of aluminum. But there was one major problem. I really had no way to EASILY cut the sheet steel. I have a friend with a machine shop that can get me the metal but his shear won’t handle thin sheets (If I was making it out of 3/4" stuff – no problem!). He has a bandsaw with a wide enough throat but the thought of using it to cut out all the pieces straight enough to easily weld seemed like a real challenge. So I looked at aluminum. I knew it would be more costly but I had discovered when making my spray rails that I could successfully cut 1/8” aluminum on my table saw. Not something I would want to do everyday but I if properly protected from the flying chips (long sleeve shirt, light cotton gloves and full face mask) it works extremely well.
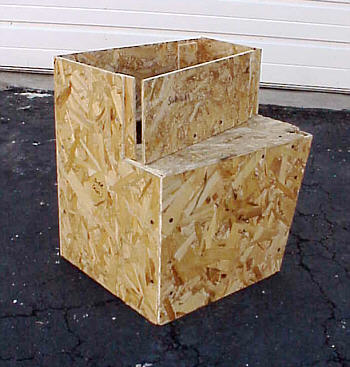
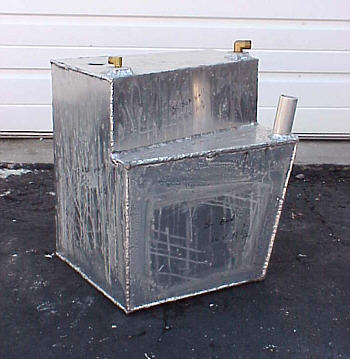
After some consideration I decided to give it a try. I borrowed a small tank of argon from my friend with the machine shop and bought some aluminum wire. About 4 hours and a pound of wire later I started to see welds that might be acceptable. Another hour or so and I had finally got it all together and could consistently run decent beads. Aluminum tanks were in my future. Next I needed to decide exactly what size and shape each tank would be in order to maximize the available space. I knew I was going to loose capacity but hoped to keep it to a minimum. I bought a sheet of 1/4” OSB and went about making a mock-up of tank. I figured it would be easer and much cheaper to use a $6.00 sheet of wood as opposed to a $100+ sheet of aluminum. I played with the shape until I had a workable solution and then use it for the final measurements. I wanted the maximum amount for gas possible so loosing the storage area currently over tanks would be another casualty of the repair. With this done I created a cut list and feed the numbers in to a computer program I have called Sheet Layout 7.0. This is a slick application I use for plywood layout. It looks at the piece sizes and grain direction you input and then intelligently lays it out on a 4X8 sheet (or whatever size you specify) to minimize waste. You can printout the drawing with measurements and take it back to the shop to make the actual cuts. If more than one sheet is needed it makes the drawing of each. In my case it showed I needed a 4’x 6’ sheet to make both the tanks. I had my friend order the sheet of 1/8” 5052 aluminum at a cost of about $90.00 (his cost). When the aluminum arrived I used my 7 1/4” circular saw with a carbide blade and a straight edge to cut the large sheet into more manageable sizes. I then was able to very accurately cut the needed pieces which would make the welding easier. I pre-drilled the hole for the fuel gauge sending unit and tapped the 1/8” aluminum for the screws that hold it in place. Using corner clamps I was able to assemble four of the six sides and tack weld them together. I placed the tack welds on the inside to make it easier to make smooth continuous on the exterior. With this done, I then tacked the remaining two sides in place and then proceeded to weld the entire assembly. The same procedure was then completed on the second tank. I then dropped them place at the transom to be sure they fit and to finalize the positions for the fuel pickups and vents. Next, pre-drilled and tapped bosses were welded in place to accept the fittings for these and brackets were added to allow the tanks to be bolted in place. At this point the tanks were fairly well complete but needed to be leak tested. I blocked the 1 1/2” fuel fill with a rubber cork and attached a section of 5/8” hose to the vent and used a 3” piece of dowel rod to block it. I then fabricated a scrap of aluminum to block the sending unit hole and added a tubeless tire valve stem to serve as an a fill point. ON the fuel pickup line I attached a “low pressure” air gauge. Actually this was a gauge designed to monitor fuel pressure and read from 0 to 15 lbs. My test would only involve about 2 to 3 lbs of pressure as I was warned any more than this could crack the welds. Setting my compressor regulator to about 5 lbs I added air to the tank. I then used s solution of dishwashing soap and water to check for any leaks. I found a few pinholes and used the welder to seal them up. Once done, I still noticed that the pressure would drop although I could find no leaks. That’s when I wiped some of the solution on the end of the wood dowel. It bubbled like crazy! I realized that the air was moving through the grain of the wood. I replaced it with a piece of metal and the pressure held. The tanks were then installed and the plumbing completed. I didn’t weigh the tanks but the calculations say they should weigh about 20 lbs each. When I filled the tanks I found that my total capacity has been reduced from 30 to 25 gallons. This was expected but still disappointing. If these were integrated into the hull when I was building the CS I am sure I could have maintained the capacity as well as some of the storage area.
As they say, hindsight is 20/20. It could have been a lot
worse and I am back on the water again. I was only down about a week
and half and before I did the repair I took time to make another nice
run. We towed Therapy to Chicago and dropped it in and traveled
south on the Illinois River to the Mississippi River (my wife returned via
highway with the trailer). From there we traveled past St. Louis and on to
my homeport on the Kaskaskia river. A nice trip of 477 miles.
I will add a story about the outing to the web site when time
allows.
|
 If you have read the previous pages
about constructing my version on the Cabin Skiff you know that one of the
problems I encountered was the question of ethanol found regularly in
gasoline. It wasn’t until after I built-in the tanks that I was
informed that the alcohol in the fuel would probably destroy the epoxy
resin. I launched a search for a sealer that would protect the tanks and
settled on another epoxy resin that was advertised as capable of
withstanding the corrosive nature of the ethanol. (The photos is of the
inside of the tank and shows the "sealer" peeling off.)
If you have read the previous pages
about constructing my version on the Cabin Skiff you know that one of the
problems I encountered was the question of ethanol found regularly in
gasoline. It wasn’t until after I built-in the tanks that I was
informed that the alcohol in the fuel would probably destroy the epoxy
resin. I launched a search for a sealer that would protect the tanks and
settled on another epoxy resin that was advertised as capable of
withstanding the corrosive nature of the ethanol. (The photos is of the
inside of the tank and shows the "sealer" peeling off.)
 But when I reinstalled the connector
and tried the bulb it was still blocked. I removed it again and peered
down inside the backside. It was full of gold colored debris.
I knew immediately what it was – epoxy sealer. I cleaned it out and
headed for home.
But when I reinstalled the connector
and tried the bulb it was still blocked. I removed it again and peered
down inside the backside. It was full of gold colored debris.
I knew immediately what it was – epoxy sealer. I cleaned it out and
headed for home.
 But there is one problem with using
the aluminum – I don’t know how to weld it! A TIG welder is the best
answer but I don’t have one and mine is MIG. And buying one just for
this project is out of the question. When I bought my MIG I was told
that it would weld aluminum – but it wasn’t easy and would not yield as
nice a result as the TIG.
But there is one problem with using
the aluminum – I don’t know how to weld it! A TIG welder is the best
answer but I don’t have one and mine is MIG. And buying one just for
this project is out of the question. When I bought my MIG I was told
that it would weld aluminum – but it wasn’t easy and would not yield as
nice a result as the TIG.
 Reflecting now, if I were building
the CS again I think I would place the tanks under the two seats.
This would afford the full 30 gallons while still placing the tanks in a
location where they could be easily maintained. The fills could be
placed outside on the decks similar as to how I have them now. The
only problem I see is that it may be more difficult at gas stations to
reach both fills with out moving the boat. At marinas this should
not be a problem as their hoses are usually long enough.
Reflecting now, if I were building
the CS again I think I would place the tanks under the two seats.
This would afford the full 30 gallons while still placing the tanks in a
location where they could be easily maintained. The fills could be
placed outside on the decks similar as to how I have them now. The
only problem I see is that it may be more difficult at gas stations to
reach both fills with out moving the boat. At marinas this should
not be a problem as their hoses are usually long enough.