Back In The Shop
March 2001
 Getting
it in the shop itself was going to be somewhat of a challenge. I want it
to go in bow first and the concrete slab outside the garage door is sloping
up towards the door. To make matters worse, it will only clear the
door if I let all the air out of the tires. This makes it almost impossible
to "push" in by hand. I finally decided that I could use a small
electric hoist I had. By tying it off to anchors set in the concrete floor
I literally dragged the CS in the door. It went very well and only took
a few minutes. (Photos are looking up from the floor) Getting
it in the shop itself was going to be somewhat of a challenge. I want it
to go in bow first and the concrete slab outside the garage door is sloping
up towards the door. To make matters worse, it will only clear the
door if I let all the air out of the tires. This makes it almost impossible
to "push" in by hand. I finally decided that I could use a small
electric hoist I had. By tying it off to anchors set in the concrete floor
I literally dragged the CS in the door. It went very well and only took
a few minutes. (Photos are looking up from the floor)
The main reason I wanted it in the shop was to more carefully survey
the bottom of the boat. As I mentioned earlier I had discovered that I
had managed to build in some upsweep in the aft portion of the hull.
I am fairly certain that is what was causing my bow high situation.
I wanted to see exactly what I had and than try to decide if and how to
correct it.
 I
used the hoist to lift off the outboard. I then tied the tongue of the
trailer to the floor and then used my pickup truck to gently pull the Cabin
Skiff back about 2 ft on the trailer. This allowed me easier access to
the bottom without having to work around the bunks. By removing the
engine I could get away with sliding it back this far and not have to worry
about it tipping backwards. Now I was ready to take a straight edge and
tape measure and see what I really had. I
used the hoist to lift off the outboard. I then tied the tongue of the
trailer to the floor and then used my pickup truck to gently pull the Cabin
Skiff back about 2 ft on the trailer. This allowed me easier access to
the bottom without having to work around the bunks. By removing the
engine I could get away with sliding it back this far and not have to worry
about it tipping backwards. Now I was ready to take a straight edge and
tape measure and see what I really had.
Well I did just that and I was shocked! And embarrassed. I
am ashamed to admit what I found because I still can't believe I missed
this much of an error. Running a straight edge along the chine shows
NO problem - everything is flat as it should be. I then ran the line
along the bottom of the transom from the chine to the keel it is also straight.
BUT run the straight edge down the keel and about 18" from the transom
it starts to sweep up and at the transom it is 5/8" above where it should
be. That's 5/8 of an inch off in 18"!!!
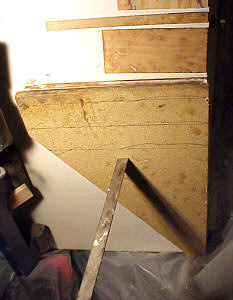 Further
inspection with the straight edge showed that if I start from the mark
on the keel 18" forward of the transom and run to the corners where the
chine and transom meet they are also flat. So what I have is a "V"
shaped area (see top photo) rocking up in what is probably the most
critical area on the hull. I don't know a lot about boat building and/or
design but this can't be good! I still can't figure how this happened but
I am betting it had to do with my method of lengthening the hull by 2 ft
and resizing the transom. Further
inspection with the straight edge showed that if I start from the mark
on the keel 18" forward of the transom and run to the corners where the
chine and transom meet they are also flat. So what I have is a "V"
shaped area (see top photo) rocking up in what is probably the most
critical area on the hull. I don't know a lot about boat building and/or
design but this can't be good! I still can't figure how this happened but
I am betting it had to do with my method of lengthening the hull by 2 ft
and resizing the transom.
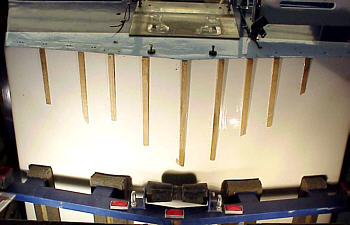
I can't live with this - I have to correct it. What I decided
to do is to take strips of hardwood 3/4" wide and cut to the exact taper
needed to flatten the bottom at a particular point. I placed one
of these on the keel and then continue with the next about every 4" to
6" across the bottom (photo is looking up from the floor). These will serve
as "guides" to establish the correct profile. Between these I will cut
and epoxy some less accurate plywood wedges. These will simply be
installed to reduce the amount of epoxy paste needed to fill the void.
I hope this will yield a relatively flat bottom and correct my problem.
At any rate it can't be much worse than it is now!
 My
first thought was just to trowel on the epoxy paste as smoothly as possible
by hand but then another builder suggested using a couple pieces
of Formica (with mold release) backed with plywood could be pressed against
the hull and make an almost finished job of it. I dug around the
shop and found a couple of "sink cut-outs" from a kitchen project.
They were about the right size, already had the plastic laminate on one
side and were flat. I cut them to shape with each covering half the area
to be repaired. I decided to do one side at a time so I troweled
on the epoxy paste and then pressed the sheet against the bottom of the
hull. I then wedged a piece of angle iron tightly between it and
the floor which forced the excess out around the edges. My
first thought was just to trowel on the epoxy paste as smoothly as possible
by hand but then another builder suggested using a couple pieces
of Formica (with mold release) backed with plywood could be pressed against
the hull and make an almost finished job of it. I dug around the
shop and found a couple of "sink cut-outs" from a kitchen project.
They were about the right size, already had the plastic laminate on one
side and were flat. I cut them to shape with each covering half the area
to be repaired. I decided to do one side at a time so I troweled
on the epoxy paste and then pressed the sheet against the bottom of the
hull. I then wedged a piece of angle iron tightly between it and
the floor which forced the excess out around the edges.
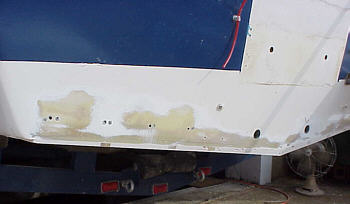
This worked well. When I removed the sections of countertop
there were a few small voids where I didn't have enough epoxy. Most of
it was very smooth and will require only light sanding to break the glaze
to be ready for paint.
In the last photo the amount of build-up can be seen along the bottom.
Next
Back Home
If you would like to know whenever I update the page
just drop me an email and I will send you a notice.
EMAIL - raymacke@egyptian.net
|