|
Page 23 Still Fine Tuning!
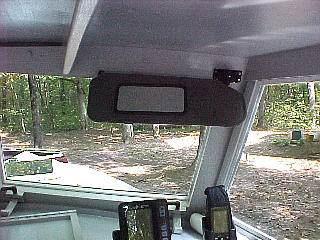
One of the changes I made to my Cabin Skiff was having the windshields tilt out at the bottom for ventilation. Living in So. Illinois where we have hot humid summers I felt that was a needed. In theory it looked like they should work well and they do - almost! What I found is that they did indeed allow a lot of air to flow in but not where I wanted it. Surprisingly the airflow follows up the inside of the windshield and then moves across the cockpit roof. While seated you feel NO air movement. Stick your hand up to the windshield or top and sure enough there it is. To solve the problem I decided I needed some kind of a deflector to direct the air down. I though about making something but then it dawned on me to use an automotive sun visor. Made a trip to a salvage yard and bought two visors the right length (and coordinating color) and attached them above the windshield. I had to weld up a bracket to mount them at the correct angle but that was no big deal. Now a can pivot them up and down and direct the air whereever I want it. Also, they still work as sun visors for those early morning or late evening cruises.
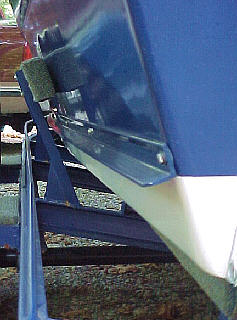
I decided I needed something to deflect the spray and send it out instead of up. I looked at several factory aluminum boat hulls and noted how they had added a deflector. (Fiberglass boats tend to flatten out the V hull and make it parallel to the water right before it hits the chine. This sprays the water outward.) I thought about using a wood runner down the side but I opted for a aluminum angle. I bought two 8’ pieces of angle 1 1/2 X 1 1/2 X 3/16. In retrospect I feel that 1/8” thick would have been heavy enough. I figured that 1 1/2 was wider than I really needed but thought I could narrow it down if necessary. In fact, I decided to taper down the forward 4’ of the rail from zero to the full 1 1/2” . I scratched my head for a while on how to accomplish this. Grind? Hacksaw? Bandsaw? All of these would work but I wanted to cut it as straight as possible (not to mention as easily and quickly as possible). What the heck - I stuck an expensive 7 1/4” carbide blade on my 10” tablesaw and fed it through (face shield absolutely necessary)! It did a surprisingly good job.
|
 Here
are several modifications I have made in the past couple of weeks.
Here
are several modifications I have made in the past couple of weeks.
 Another
modification is what I call spray rails. I know there is probably
a correct nautical term for them but darned if I know what it is.
The CS tends to spray a lot of water up the aft sides. My aft decks
usually get wet in a short period of time. Not a lot of water,
as it never is enough to actually run in but more of annoyance if you walk
back and want to sit on the aft deck. When I added the small swim
platform to the transom I found that water flowing up past would hit the
platform’s outside handrail and spray forward onto the outboard cowling
– again messy. Plus just looking out at the aft sides while at cruise
speed there just looked like a lot of water in the air.
Another
modification is what I call spray rails. I know there is probably
a correct nautical term for them but darned if I know what it is.
The CS tends to spray a lot of water up the aft sides. My aft decks
usually get wet in a short period of time. Not a lot of water,
as it never is enough to actually run in but more of annoyance if you walk
back and want to sit on the aft deck. When I added the small swim
platform to the transom I found that water flowing up past would hit the
platform’s outside handrail and spray forward onto the outboard cowling
– again messy. Plus just looking out at the aft sides while at cruise
speed there just looked like a lot of water in the air.
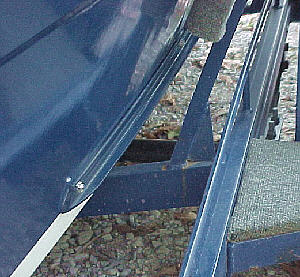 I
them bolted it to the side of the hull. I placed the bottom of the
angle on my painted water line. Actually adding the rails solved
two problems - the water spray and a paint pealing problem. I had
painted the below the water section of the hull with “Polypoxy” epoxy paint
and then did the above the waterline with “Easypoxy”. I must
not have sanded the Polypoxy well enough right where the Easypoxy
started because the spray coming up side had begun to peal it off in a
couple of spots. I didn’t go very far – about 1/4” but it did
look bad. By placing the rail there it covered the ragged edge and
prevents it from going any farther. PLUS it did a very good job of
flattening the spray and everything now stays dry.
I
them bolted it to the side of the hull. I placed the bottom of the
angle on my painted water line. Actually adding the rails solved
two problems - the water spray and a paint pealing problem. I had
painted the below the water section of the hull with “Polypoxy” epoxy paint
and then did the above the waterline with “Easypoxy”. I must
not have sanded the Polypoxy well enough right where the Easypoxy
started because the spray coming up side had begun to peal it off in a
couple of spots. I didn’t go very far – about 1/4” but it did
look bad. By placing the rail there it covered the ragged edge and
prevents it from going any farther. PLUS it did a very good job of
flattening the spray and everything now stays dry.