Page 18
 I
received the gas tank sealer and proceed to apply it. First , I wiped
down the interior tank walls with lacquer thinner and then lightly sanded
to encourage adhesion. The resin was in a pint can (full) and the
hardener was in a ½ pint can (not completely full). When the two
were mixed it had a consistency about the same as Glen L‘s Poxy Shield
so brushing on was easy. I
received the gas tank sealer and proceed to apply it. First , I wiped
down the interior tank walls with lacquer thinner and then lightly sanded
to encourage adhesion. The resin was in a pint can (full) and the
hardener was in a ½ pint can (not completely full). When the two
were mixed it had a consistency about the same as Glen L‘s Poxy Shield
so brushing on was easy.
Caswell state that each sealer kit would do about two 5 gallon tanks.
Because of this I ordered 3 kits at about $20. Since I was brushing
it on there was concern I would miss a spot or two so I decided to apply
more than one coat. I used two of the kits to apply 3 coats and still
had some left over. Caswell Inc allowed me to return the unopened
kit for a refund. I lost part of my first batch because it started
to set-up quicker than I had expected. I had about 6 oz. In a plastic
cup and with in 10 minutes I had a hot ball in the bottom. For the
next batch I used a shallow pan and worked faster.
Another problem I ran into was with drips. When painting the epoxy
on the underside of the top of the tank it was understandably hard to see
exactly what I was doing. I used a mirror with some success but but I failed
to watch close enough. What happen was in my attempt to apply a heavy
coat the epoxy started to drip in spots but cured before it actually dropped
from the top. This left bumps that not allow the aluminum lid to
mate properly to the plywood and seal (remember the "lid" is being placed
on the inside). I had to reach in and cut off the excess with a utility
knife and then carefullu file the surface smooth. I did not want
to cut in too far and expose the old resin. This problem could have
been avoided if I had paid more attenion.
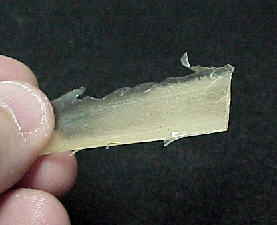
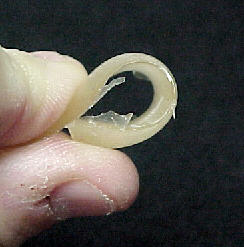 Although
this was an epoxy it is different than any I have used before. I
managed to allow some of it to run in to my 3/4 cross over fuel line
and had to remove the hose and pull it out. The piece is shown in the photos
and is about 1/8” thick. It appears that even at full cure it is
still quite flexible. As you can see I can bend it double and there
is no indication of it wanting to break. I really shouldn’t have
any flex in my tanks but in a thin metal tank this would be a plus. Although
this was an epoxy it is different than any I have used before. I
managed to allow some of it to run in to my 3/4 cross over fuel line
and had to remove the hose and pull it out. The piece is shown in the photos
and is about 1/8” thick. It appears that even at full cure it is
still quite flexible. As you can see I can bend it double and there
is no indication of it wanting to break. I really shouldn’t have
any flex in my tanks but in a thin metal tank this would be a plus.
Now if it only handles the ethanol! I have made a test
strip I am going to submerge in gas and allow to set for an extended period.
I think I will also drop a piece of the material from inside the hose.
Time will tell.
 At
this point I have completed most all the actual building and am starting
the finishing process (not my favorite!). Several things I
have recently completed are the doors and hatch leading to the berth, the
instrument panel, the handrails that will be attached to the cabin top
and the portlights. At
this point I have completed most all the actual building and am starting
the finishing process (not my favorite!). Several things I
have recently completed are the doors and hatch leading to the berth, the
instrument panel, the handrails that will be attached to the cabin top
and the portlights.
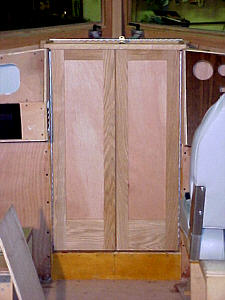
The plans really don’t give much direction for the berth doors.
They suggest because of limited space a snap on canvas cover or drop board
be used. Personally, I wanted something more convenient and secure.
There are going to be times when the CS is left unattended over night and
I wanted a way to lock the berth. I decided on dividing the opening
in half with two doors that swing out. I built these doors with the
stile and rail method from 3/4” stock and used 3/8” plywood for the
door panel. They are attached to the entry door jambs with 2” aluminum
continuous hinge. When underway these doors will have to be
closed as the one does swing back and contact the side of the steering
wheel.
 When
I need to secure the berth or during cold weather these doors will work
just fine but really the majority of my use will probably just knocking
abound during the hot summer. With the doors closed the berth is
going to probably heat up to unbearable temperatures. With this in
mind I made the door panels removable and have made a set of screens that
fasten in their place. These will probably be in place most of the time. When
I need to secure the berth or during cold weather these doors will work
just fine but really the majority of my use will probably just knocking
abound during the hot summer. With the doors closed the berth is
going to probably heat up to unbearable temperatures. With this in
mind I made the door panels removable and have made a set of screens that
fasten in their place. These will probably be in place most of the time.
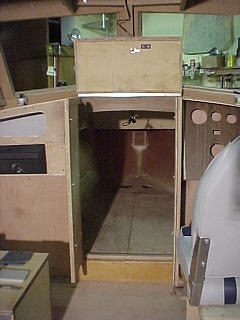
On top of the doors is a hatch. This is made from 3/8” plywood
with 3/4” solid stock framing. It hinges at the rear and when
open is held up by a plastic “hatch clip” bought at a RV supply store.
In the hatch I installed a lock (also from the RV store) that allows me
to secure both it and the doors from opening. This whole setup is
certainly not tamper proof. A good hard kick of the door panels is
all it would take to defeat it. I guess you could say it is designed
to keep out the curious not the criminal.
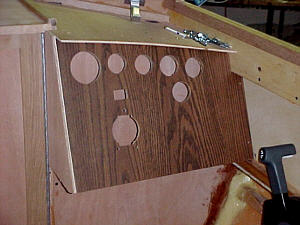 The
instrument panel is really no big deal. I finalized the position
of the instruments and cut the holes. When making it one thing did
come to mind – I am building a boat from wood, yet in my finished product
no wood grain will be visible (that is if I sand enough before painting!).
I got digging around the shop an came up with a piece of plastic
laminate (Formica) that was left over from a furniture project and decided
to use it for the panel. Yea, I know, it’s not real wood but at least it
will have the appearance of wood not just paint. The
instrument panel is really no big deal. I finalized the position
of the instruments and cut the holes. When making it one thing did
come to mind – I am building a boat from wood, yet in my finished product
no wood grain will be visible (that is if I sand enough before painting!).
I got digging around the shop an came up with a piece of plastic
laminate (Formica) that was left over from a furniture project and decided
to use it for the panel. Yea, I know, it’s not real wood but at least it
will have the appearance of wood not just paint.
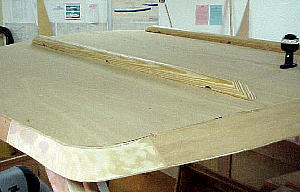 Next
is the handrails that will be mounted to the top of the cabin. I
had looked at factory made rails and what few I found that might fit were
too expensive for my taste. I then considered custom making my own
with components available in most marine catalogs. The price was
better but I really couldn’t find anything I thought I would like the looks
of on top the CS. I wanted something more low profile and a little
sleeker than the normal tube assembly. Next
is the handrails that will be mounted to the top of the cabin. I
had looked at factory made rails and what few I found that might fit were
too expensive for my taste. I then considered custom making my own
with components available in most marine catalogs. The price was
better but I really couldn’t find anything I thought I would like the looks
of on top the CS. I wanted something more low profile and a little
sleeker than the normal tube assembly.
After looking around I decided on using two 4’ pieces of “handrail.”
I bought these at Home Depot. The are formed out of yellow pine and
are made to mount on metal brackets along stairways. I cut the ends
at a 60 degree angle and will attach them with screws from the underside
of the cabin top. Since I really don’t know how they will hold up
I don’t plan to glue them in place. On each end and in the center
I cut a hole that will allow a rope to pass through. This will let
me tie items (innertube / inflatable toys) down on top.
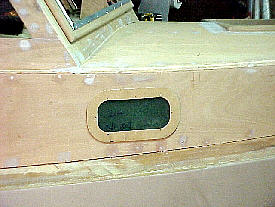 The
last item is the portlights. I debated as to whether or not to install
these but decided it would be a nice feature. If I am sleeping on
board and hear the blast of an air horn and the roar of diesel engines
it would be nice to be able to quickly look out and see the bow of the
barge that is about to turn the Cabin Skiff into tooth picks! At
least I thought it was a good idea until I priced these. The cheapest
plastic portlight I could find was still about $80 a piece! To rich for
me. So I started digging around the shop again (I am telling you,
I have a lot of junk around) and came up with a piece of 1/4” lexan
. I decided to cut out the plastic for the glass and then cut a hole
in the cabin wall the same size. To hold it in place I fabricated
a mounting ring from 1/8” plywood. This overlaps the glass by 1/2”
and the wall by 3/4”. I will glue the ring to the wall and use
#6 machine screws to attach the glass. This will allow a fairly flush profile.
They won’t open but will allow me to see out. The
last item is the portlights. I debated as to whether or not to install
these but decided it would be a nice feature. If I am sleeping on
board and hear the blast of an air horn and the roar of diesel engines
it would be nice to be able to quickly look out and see the bow of the
barge that is about to turn the Cabin Skiff into tooth picks! At
least I thought it was a good idea until I priced these. The cheapest
plastic portlight I could find was still about $80 a piece! To rich for
me. So I started digging around the shop again (I am telling you,
I have a lot of junk around) and came up with a piece of 1/4” lexan
. I decided to cut out the plastic for the glass and then cut a hole
in the cabin wall the same size. To hold it in place I fabricated
a mounting ring from 1/8” plywood. This overlaps the glass by 1/2”
and the wall by 3/4”. I will glue the ring to the wall and use
#6 machine screws to attach the glass. This will allow a fairly flush profile.
They won’t open but will allow me to see out.
On to the finishing process.....................
Photo showing handrail profile.
Next
Back
Home
|