|
Just my opinion
When mixing epoxy putty always have another assembly that needs gluing or a place for a fillet prepared. I almost always mix up too much for the project at hand and having some place to go with it will save a lot of waste. Even if you use it to fill counter sunk screw heads is much better than throwing it away ***************** If I was ordering the "Stitch & Glue" kit again I would ask to substitute the 6 gallon of Epoxy Shield for the 3.5 gallon recommended. It would save several dollars and you WILL use the extra epoxy. You will need more filler too. *****************
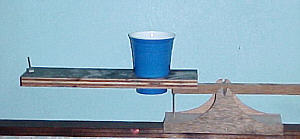
I use small flat washers dropped over a finishing
nail on the very end to fine tune the balance. There is a 3" drywall
screw screwed into the base and serves as a stop for the 16 oz. cup side
(below and to the right of the cup in photo above). I pour whatever
amount of resin I need in the large cup and then add the hardner to the
small cup until it balances. Using this simple scale I can
quickly and accurately mix from 0 to 19 oz of resin & hardner at one
shot. Cost - about an hour building time. ***************** Lay the fiberglass tapes over uncured fillets. This works for me. I lay down the fillet and allow some time until it starts to get a little firm. I then brush a coat of unthickened resin over the fillet. If you don't wait too long the brush can be used to smooth out any defects in the fillet. Then lay the glass cloth strips in the wet resin. Allow a few minutes for the resin to wet the cloth and then brush on more resin where needed. This saves a bunch of time as you ae not waiting for it to cure AND there is no wiping down and sanding of the fillet before applying the cloth. ***************** Don't use the Silicon Bronze screws for the dry lay-ups. Since I am using white oak everything must be dry fitted and pre drilled - even nails. The bronze screws are very soft and easily broken or heads stripped out. Buy some 1" and 1 1/4" drywall screws and use these for holding the parts in place. The drywalls screws are hard and can be used over and over as long as you don't get epoxy in the heads. Use them to hold those butt blocks in place and remove when the epoxy is set and use them again. Don't use the bronze until you are gluing the assembly in place permanently *****************
*****************
*****************
|
 Build
a simple epoxy scale. Mine is made from scrap wood and uses an 1/8"
piece music wire for a pivot point (16 common nail would work fine) resting
on 1/8 plywood rails. I set it up to use a 16 oz. plastic cup on
one end and a 5 oz. cup on the other. I bought the cups at WalMart.
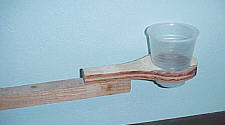
  The
large plywood base for the 16 oz cup was needed to offset the weight of
the arm for the 5 to 1 ratio. In this case the center of large cup
is 6" behind pivot point vs center of small cup 30" forward
of pivot point. Adjust these measurements to accomodate different
mix ratios

 Buy a couple wood screw drill bits. These can be found at most hardware
stores for about $3.00 each. They are available for different size
screws (#6, #8 and #10 usually) and the length is adjustable. Get
3 of the #8 and set to 1", 1 1/4" & 1 1/2" so you can quickly change
from one to the other.
 A couple of other tools I find helpful are -

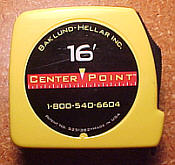
 Also
there is this "CenterPoint" tape measure. It is very handy and one
of those things that will make you say, "Why didn't I think of that!" It
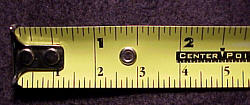
is simply a std tape measure but the scale on the bottom is 1/2 the normal
inch scale on the top of the blade. Measure a piece as usual - say
56 3/16". Now look at the bottom scale at 56 3/16 and that mark will
be exactly half the length. This allows you to find the center of
a piece quickly and accurately with to calculations. This also works in
reverse. When working with symmetrical parts the Cabin Skiff plans often
show them as just one half. Measure it using the bottom scale and
then use the top scale to lay out the full size part. It cost about
$15.