 My
original instrument install included a Lowrance LCX-37C plotter and the
unit has served well. The model had been introduced in 2007 but I
purchased it new in 2010. At that point it was being discontinued
to make way for the newer entries and the price was right. It
still performs flawlessly and hated to remove it but I wanted to add
radar and it was not compatible with the current units. I
sold it on Ebay and I am sure it is still seeing good use.
My
original instrument install included a Lowrance LCX-37C plotter and the
unit has served well. The model had been introduced in 2007 but I
purchased it new in 2010. At that point it was being discontinued
to make way for the newer entries and the price was right. It
still performs flawlessly and hated to remove it but I wanted to add
radar and it was not compatible with the current units. I
sold it on Ebay and I am sure it is still seeing good use.As with most things electronics particularly current models always demand the highest price as they have all the latest bells and whistles. When the new models are introduced the previous year’s offerings are usually steeply discounted and this is where my purchases usually fall. In this case, I opted for the Lowrance HDS 9 Touch 2nd Gen. The main difference between it and the newer unit ( 3rd Gen ) is the 3rd includes the option to do many functions on either a touch screen or with side mounted buttons. The 2nd Gen is mainly touch screen. I didn't see this feature worth the almost $500 more.
The advantage of having radar is obvious. In fact, I have it on my 18' Cabin Skiff and it has proved helpful on many occasions. But on my True Grit I wanted two additional benefits. The first was to help monitor nearby boat traffic. It is called Mini-Automatic Radar Plotting Aid or MARPA and it allows the radar to lock on a target, calculate its course and speed and add an icon showing the direction of travel. It will then automatically warn you if it enters a user designated danger zone on a collision course. It can track up to 10 different targets at one time, which should prove very helpful in busy traffic areas.
I also wanted the ability to overlay the radar screen on the plotter screen. This might not be a great benefit in some areas like open water or some coastal areas but I knew from experience when running rivers the radar return can sometimes be confusing with nearby shore lines on both sides. Vessels near the bank can sometimes blend in – even ones as large as commercial tow/barges. My hope is using radar overlay will help sort this out. Also, at times and overhead power line is hard to distinguish from a bridge and having the radar painted on the chart should help.
The Install
 I had hoped to be able to modify my existing panel to accommodate the new GPS but that was not to happen. The outline of the new unit was about the same width but not as tall so a panel would be
need to be fabricated. It is made from 1/8” aluminum plate and
fortunately I had a piece on hand. Having the old one for the
outside edge template made this process fairly simple. While
making the change I decided to take advantage of situation and
rearrange the instruments so usage would flow a little
better. This did involved reworking some of the already
complex panel wiring behind the panel but having all the individual
wires labeled helped tremendously. All in
all, installing the new GPS/chartplotter was a fairly
uncomplicated process.
I had hoped to be able to modify my existing panel to accommodate the new GPS but that was not to happen. The outline of the new unit was about the same width but not as tall so a panel would be
need to be fabricated. It is made from 1/8” aluminum plate and
fortunately I had a piece on hand. Having the old one for the
outside edge template made this process fairly simple. While
making the change I decided to take advantage of situation and
rearrange the instruments so usage would flow a little
better. This did involved reworking some of the already
complex panel wiring behind the panel but having all the individual
wires labeled helped tremendously. All in
all, installing the new GPS/chartplotter was a fairly
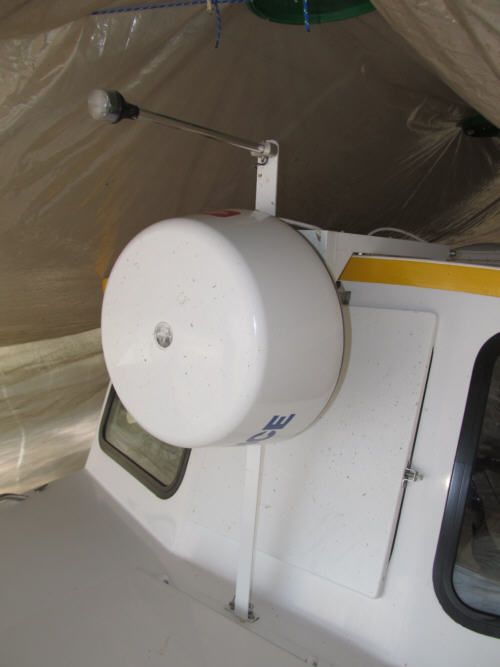
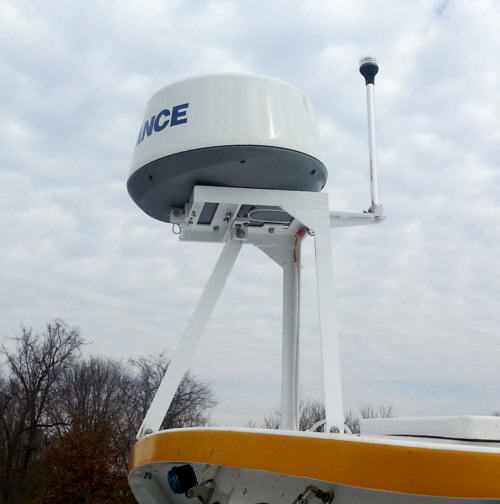
uncomplicated process. Not so with the radar. Here I had several factors that needed to be addressed. First, we plan to carry and inflatable dingy on the cabin roof. Because of this the radar needed to me mounted high enough to shoot over its 15” tubes. But this is a trailered boat and having the scanner setting over 2' above the cabin top would place it more than 13' above the road surface. This in turn would subject it to possible damage from tree limbs and other low hanging hazards, not to mention the stress and drag at 60 mph. The obvious answer was to mount it in such a way it could fold down reducing the profile. But the question was exactly how to go about doing this.
Since setting up and folding down would occur every time I used the boat I wanted the process to be as simple as possible. But at the same time it needed to be a strong mount to handle the loads created when in rough water. The 19” round antenna weighs about 18# and placing that on top a 2' tall tower can create some inertia when swinging to and fro.
I considered several different methods of lowering scanner and as usual each had strong and weak points. In addition to the antenna the anchor light would also need to be mounted on the tower and extend at least 4” above. I finally decided the best solution was to use a three legged mount. Two legs would be aft and a single leg forward. If I positioned the assembly far enough forward on the saloon top I could remove the front leg and allow the tower to fold forward with the majority of the scanner ending up hanging down in front of the windshield. Although the rear mounted anchor light would then project upward the overall height would greatly reduce. The front leg could be pivoted down and attach to a bracket in the berth top. This would carry the majority of the weight of the unit when being trailered.
One complication was I did not want a separate forward leg to handle the trailer position. I simply wanted to release the bottom of the leg from it's mount and lower it down and reattach in a duplicate mount on the berth top. The problem with this is the tower would need to be a very exact height so the single leg would not only hold it upright in the correct position but also reach the berth top while lowering the scanner and much as possible. Once again I called in to action DrawPlus a Windows app I used extensively in the original construction. After taking some accurate measurements directly off the boat I duplicated everything in DrawPlus and plotted out the entire design. It allowed me not only to scale it out but also rotate it through the up and down positions to insure a proper fit. With the plan complete I ordered the 1 1/4” aluminum angle I would need to fabricate it.
 I
constructed the tower using my MIG welder. Since I don't
have a spool gun this is a real pain as the aluminum wire does not like
to feed through the long gun cable. But finally with several
birds nest of poorly fed wire I was done. Dry fitting of
just the tower went well and I attached the mounting brackets I had
fabricated. I then took the tower back to the shop and
painted it. At this time I did not yet have the radar unit
but did have the template to drill for the mounting. The
idea was to have the tower completed and installed and then just add
the scanner to the top when it was delivered.
I
constructed the tower using my MIG welder. Since I don't
have a spool gun this is a real pain as the aluminum wire does not like
to feed through the long gun cable. But finally with several
birds nest of poorly fed wire I was done. Dry fitting of
just the tower went well and I attached the mounting brackets I had
fabricated. I then took the tower back to the shop and
painted it. At this time I did not yet have the radar unit
but did have the template to drill for the mounting. The
idea was to have the tower completed and installed and then just add
the scanner to the top when it was delivered.Everything went according to plan – until I added the radar scanner. Although I had the tower in place before I really had not stood back away from the boat and looked at it. Now with the scanner on it I decided I didn't like how it looked. The three straight legs of the tower simply reminded me of a milk stool sitting on top the boat – I found it very unattractive! I went back and forth trying to convince myself it wasn't that bad but ultimately decided something must be changed. But what? I hated to scrap the entire thing and start over!
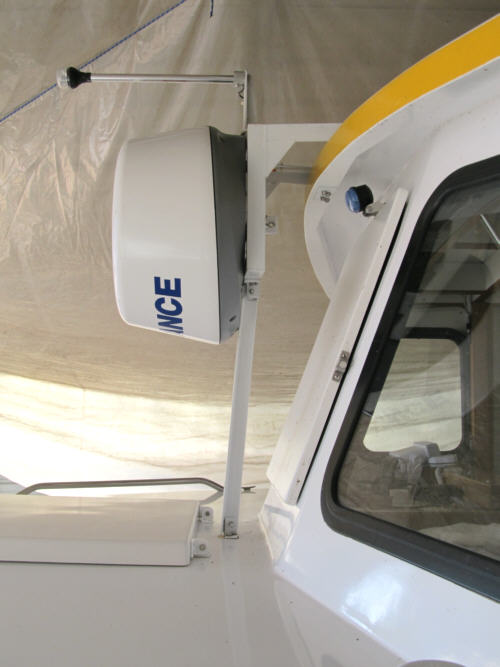
Back to the drawing board (APP). It seemed the main problem was the three legs standing straight up and down – the milk stool effect! I found setting the forward leg at an angle helped considerably with the appearance, especially when it matched the slant of the windshield. But could I make it work while still retaining the same length of the forward leg? A little more messing with the drawing app revealed by adding an additional mount point to the tower both aft and lower of the original it was possible. The only problem was this layout would involve moving the leg not only from one lower mount to the other but also doing the same on the top mount. A hassle – yes – but a minor hassle. For me it was workable and worth the improved anesthetics.
?The mounting and wiring was straight forward and completing the install was no problem..
Operation and The Problem
To make MARPA work the Lowrance system requires their radar interface box and a heading sensor. The interface box comes with the 4G Radar but not the lower cost 3G. The heading sensor is additional and naturally Lowrance sells one the RC42 (Amazon price about $600). But they also call out the specifications for the sensor and infer other brands will work if they meet the specs. The Raymarine EV100 Autopilot I was adding includes a heading sensor that does indeed comply so having it on the NMEA 2000 network should provide the needed heading data for MARPA.
AND it almost works. Well, actually it does work but only about 70% of the time. For some reason MARPA will just drop off and a warning pops on the screen telling me it is not connected. A minute or two later it will come back on line and work for a while and then repeat the error.
Several calls to both Lowrance and Raymarine yielded nothing but finger pointing. Lowrance said it MUST be a Raymarine problem and Raymarine said it was a Lowrance problem. Each said they could not trouble shoot the other ones problems and neither was really interested in helping even though I had just spent several thousand dollars buying their equipment. I will say Raymarine was more considerate than Lowrance. Lowrance just stated I needed their heading sensor.
My next thought was I would buy their $600 Lowrance sensor and remove the Raymarine sensor and sell it to recover part of the cost. NOPE! Raymarine informed me the RC42 would not run their auto pilot it had to have their EV-1.
Finally, after two weeks of calling and experimenting with possible fixes (my first thought was an error with my soldered together Raymarine to NMEA 2000 cable - not the problem) I gave in and bought the additional heading sensor. I sure wasn't happy about it and still have a bad taste in my mouth for both companies. Doubt I will ever again buy products from either.
But Does It Work?
Yes, now everything is running well. Oddly the Lowrance plotter and radar will run just fine using the Raymarine EV-1 sensor. I can go into the plotter's network setup and select the EV-1 as the source for everything and all is well. But if I unplug the RC-42 MARPA gets flaky. I have no idea why and now the money is spent it is not worth getting upset trying to ask Lowrance why.
My Opinion
The radar works well. It is particularly impressive up close showing small objects. Radar overlay is very helpful at times and I am glad I have the feature. I will say, like my other radar, smaller fiberglass boats - particularly if coming at you - are hard for the radar to see. And bass boats are the worse as they are low to the water and fast moving. But I am still learning to use the unit and as I sort through the settings I am thinking with experience can probably improve on the situation. Overall I am pleased (now it is working).
MARPA on the other hand is a little disappointing - at least for my current usage. Somehow in my research I missed that Mini-Automatic Radar Plotting really isn't automatic (that requires ARPA not Mini). In order to track a target you must first see it on the screen and then touch the target on the screen to acquire it and start the process. Then it takes 30 seconds or more for MARPA to lock on and provide the information. Often with fast moving boats they are already very near or even past before MARPA locks. But I can see if running in busy shipping lanes were larger ships can be targeted farther away and are moving slower MARPA could work very well. Just not on a busy Saturday on Kentucky Lake with bass boats zipping by at 60 mph.