|
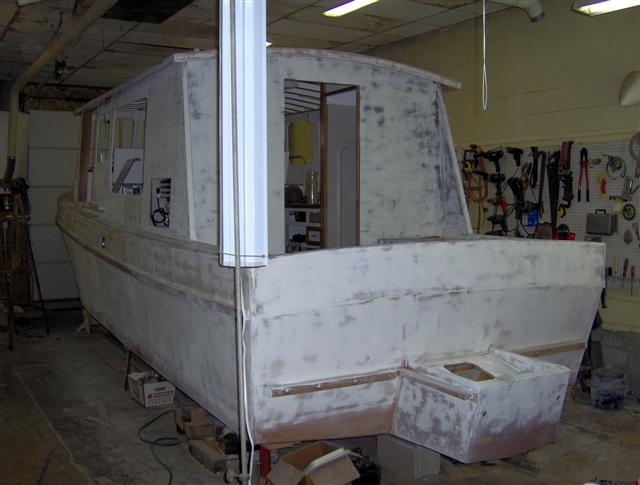
But this is where reality started to disrupt my building plan. My large but totally un-insulated shop is not easy to heat during the winter and holding the needed temperature for painting would be a problem. I decided the only solution was to have the painting completed by late fall. This meant I would have to work through the summer to get it done. Not what I had planned as when the weather is warm I would rather be boating, riding my motorcycle or anything outdoors. Not working in the shop. But if I were to wait for winter to begin the process several months would be lost waiting for mild enough spring weather. And so it began. Building a 27 ft boat is a substantial undertaking but it tends to grow slowly and the dimensions become somewhat muted. But the true size of the beast suddenly becomes apparent when you start sanding. And sanding. And sanding. Coating the exterior with epoxy was also time consuming but it was performed in stages. First the hull (before it was rolled), then the cabin walls and finally the cabin roof. This all took place over a long period of time so the labor did not seem extreme. But now there is the sanding. The entire exterior surface must be addressed in preparation for the primer. I have no idea how many hours were spent with sander in hand but to say considerable seems an understatement. I did read one account of a builder of a similar size boat. He logged all his hours and offered that over 700 were spent sanding. Enough said. Although I had a problem with sanding the primer when building the Cabin Skiff the process went very well this time around. During a recent discussion with a Pettit paint tech I mentioned the primer problem and he offered that I may not have gotten all the blush off the epoxy. That he said would cause it to gum when sanding. Sounds like a reasonable explanation.
Another concern I had about using Easypoxy was the speed in which it begins to be applied. It has to be rolled on quickly in small overlapping areas and then tipped off. Work too slowly and the overlaps will not flow together and can be seen. This was not a big problem on the 18 ft Cabin Skiff but on the True Grit some of the surfaces are massive. So the question was, could I work fast enough to apply it properly?
My
apprehension was heightened because I wanted to start on the top and work
down. This way any drips or
splatter from the roller would fall on unpainted surface where it could be
wiped or sanded off. But the
top is over 8 ' wide and about 16' long - one large continuous
area. Plus I had only about 3 1/2' of headspace before bumping the ceiling
tile, which would release dust and dirt. I thought about having my wife
help but couldn't see how we both could maneuver in the tight space
working on or hands and knees.
I decided to go it alone.
All things considered it didn't go too bad. Some lap areas are visible and there were a few flawed spots. But this is the first of three coats and has taught me a few things. Next time I will wear a sweatband and long sleeve shirt. Plus my application method is now dialed in so I should be able to work faster. And I hate to admit it but in the back of my mind the whole time was the thought that no one but myself will ever see the top so what's the big deal! But you know how it is - you still want it right. But then a real problem! Normally Easypoxy will dry overnight and can be lightly sanded the next for the second coat. But the next day it was still tacky. Another day passed and it was a little better but I still could easily mark it with my fingernail. The third day was not much better. The forth I tried to sand it and it just balled up. Obviously I have a big problem.
I called Pettit and explained the situation. Naturally, their first assumption is that I screwed up - too heavy a coat - to cool of temperatures - incompatible under coatings, etc. I explained I wasn't a virgin at this and had painted the Cabin Skiff twice - I know how to apply it. To me it appears there is a problem with the paint. They didn't think so and ask I wait another 2 days and see if it sets. I waited - little change.
Late the next day I called back and asked what happened - he said their sample did not cure properly. He was very apologetic and said they obviously had a bad run and agreed to send me a new gallon. As to the coat on my top they thought it would eventfully dry but would just take time. This was a relief as I sure didn't want to try to sand it all off. A few days later I received the new gallon and after waiting about 12 days it seemed hard enough to sand and repaint. Ran the second coat with no problems (besides exhaustion and sweating like crazy) and the next day it was hard and sanded easily. Finally!
After the top the remainder of the painting went well. I painted it by myself but honestly for a project this size an extra person would make it MUCH easier. One person to roll it on the other following behind and tipping it off would be much preferred. I applied the entire gallon and needed more paint. I ordered it from the same vendor but made them check to insure it was not the same lot number as the bad one. Received it and again no problems. I do love the finish this paint produces. Unbelievable gloss.
|
 Although my construction
plan was to work only during the cold winter months, the summer of 2009
brought about a bit of reality. All the main structure was complete and
interior work could begin. But I recognized there were numerous items that
needed to be completed for work to progress in an orderly fashion.
Although my construction
plan was to work only during the cold winter months, the summer of 2009
brought about a bit of reality. All the main structure was complete and
interior work could begin. But I recognized there were numerous items that
needed to be completed for work to progress in an orderly fashion.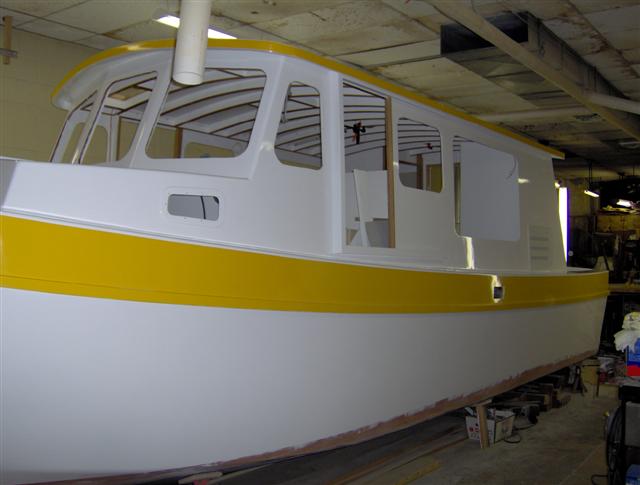 With the painting tools and tray of
paint in hand I started the assault on the salon top. It went reasonably
well but in the process a few problems with my method became obvious.
First the temperature in the shop was not hot but still warm.
With the painting tools and tray of
paint in hand I started the assault on the salon top. It went reasonably
well but in the process a few problems with my method became obvious.
First the temperature in the shop was not hot but still warm.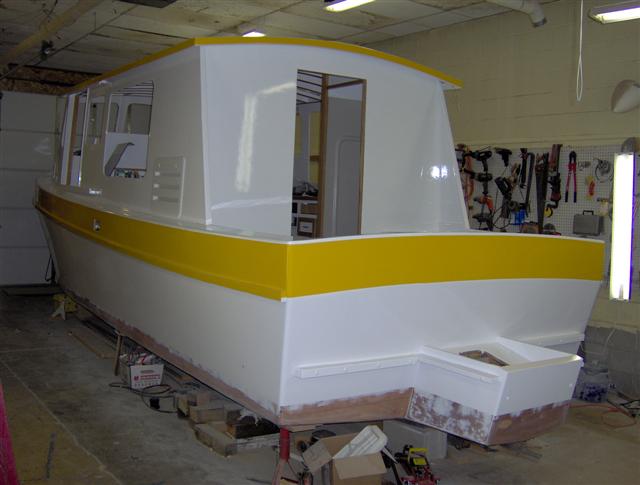 I called back and they again
started to give me the runaround about it not being the paint. Finally I
asked, "Don't you keep samples of every run?" He answered yes. I
said, "Please pull the sample with this lot number and paint something
with it.
I called back and they again
started to give me the runaround about it not being the paint. Finally I
asked, "Don't you keep samples of every run?" He answered yes. I
said, "Please pull the sample with this lot number and paint something
with it.