|
|
When it is time to put up the curtain just
moving the corner magnet near the mounted magnet causes it to
snap into place and hold tight. To remove the curtain just grab it
and pull and the magnets will release. When it is time to stow
the curtains the corner magnets will grab each other assisting in
folding them straight. This has proven to work very well. No sore
thumbs trying to make the snaps click in and no torn cloth when
trying to remove them. I expanded on the idea and also made
similar covers for the berth portlights.
Magnets purchased from Applied
Magnets. |
Privacy
Curtains
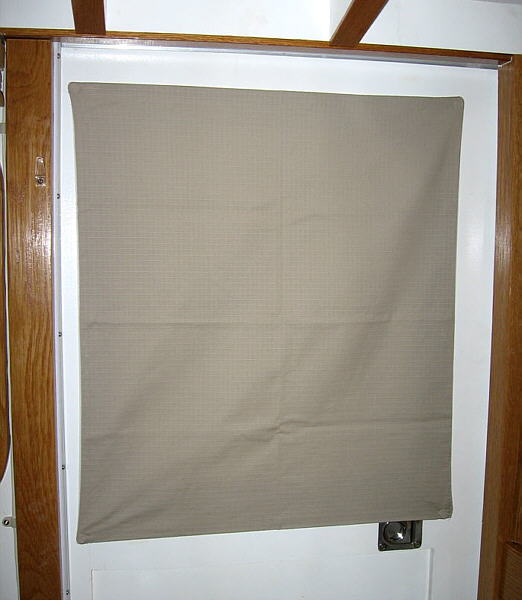
Another feature that has worked well is the
attachment of the privacy curtains on the sliding forward doors and
across the windshields. When moored at a marina or such it is common
practice to use a curtain of some type to block the view. As
mentioned before we didn't want permanent drapes because of their
bulk when in the open position. The removable curtains I have
usually seen often use snaps hold them in place. These work but I am
not a big fan of snaps in this situation as they can sometimes
be a problem to both fasten and remove. Plus, reaching to the top of
the windshields was going to be a stretch anyway.
I
decided using magnets might be a suitable method. I knew nothing
about magnets other than the one for the windshield would need to be
very strong since the cover is fairly large. But the web provided
the education I needed and I located some very strong 1/2"
round by 1/8" thick magnets. I ordered half of these with a tapered
hole in the center to accommodate a screw. The other half were just
flat disk.
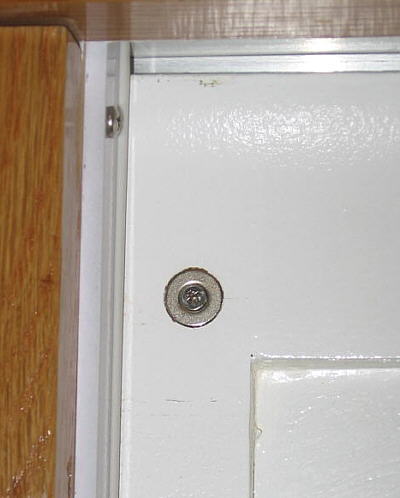
The photo above on the left is the top
corner of one sliding door. Because I needed zero clearence so they
would pass behing the weather striping I installed four of the
magnets by countersinking them flush in a 1/2" hole. A screw
was used to hold them in place. On the doors
curtains I sewed one of the flat disk into the material of each
corner. The one piece windshield cover has 12 magnets sewn in
(yes, I have my own sewing machine).
|
|
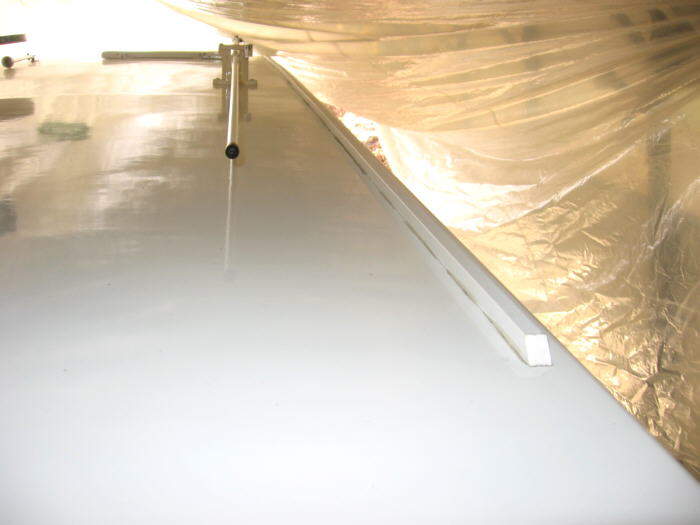
Photo is looking down on top. Drip
rail is to the right and folded down VHF antenna is to its
left |
Drip Rails
An
item I omitted when building was drip rails. Why I didn't do this
while in the shop is beyond me. I think I convinced myself they
wouldn't be necessary. The very first time we were in a light shower
my mistake was obvious. I decided a simple
fix would be to add a small runner down the saloon top near the
edge. Not only would it channel water aft but could also serve as a
handhold when standing on the side decks.
I
really didn't want to drag out the epoxy and paint to make 10' long
wood strips so I looked for an alternative. I decided on a 1" x
2" x 3/4" made from PVC. This type of material is available at
lumberyards and is use as a substitute for exterior wood molding. It
is paintable but had a semi-gloss white finish that matched very
well so I didn't bother. I ripped off the two outer edges for use.
The cut edge was placed down, chalked and the whole thing was
screwed in place. Solved the drip problem and rain water is allowed
to run off the top aft once past the windows.
|
|
Manual
Wiper
Another problem had to do with windshield wipers. I had
originally installed an electric wiper on the helm side but trying
to control cost a little I decided on a manual unit on the other
side. From the pilot's seat you have decent vision out the single
windshield so I didn't feel the need for another $100 wiper if it
didn't benefit me
But the "me" in that statement was the
problem. The Admiral decided if she was going to sit there she too
wanted a clear view AND a manual crank handle wasn't going to get
it.
Enough said. |
|
Inverter
And talking about
the Admiral's needs bring me to the next omission. My time spent in the
Cabin Skiff may somewhat have distorted my thought process concerning what
is needed compared to what isn't. One item I decided wasn't necessary was
an inverter. I reasoned we had a generator and on the occasions 120v was
needed we would just run it. Why deplete the batteries if there was an
alternative? Plus we have a small plug-in 100-watt unit and it will power the 19"
LCD TV we have onboard. What else did we need?
But this logic soon
proved faulty. The main problem is I am very conscientious of the
noise created by the generator. In the mornings if we are anywhere near
other boats of even homes on the shore I will not run it. Just don't want
to disturb anyone, as I know how aggravated it makes me when I am on the
other end of this situation. So we were finding is at least 50% of
the time I would not run the generator and we went without the use of
120V. My wife is a trooper and she said it was no big deal but still I
could tell she was disappointed. She likes a morning cup of coffee and/or
heating up her hair rollers if needed. Since I do not partake in either
coffee or tea (or hair rollers!) the need was completely overlooked
in my planning. I came to the decision although not "necessary", her stay
on the boat would be much more enjoyable if we had one. That alone is
enough to justify the cost. I added a 1500-watt inverter.
|
|
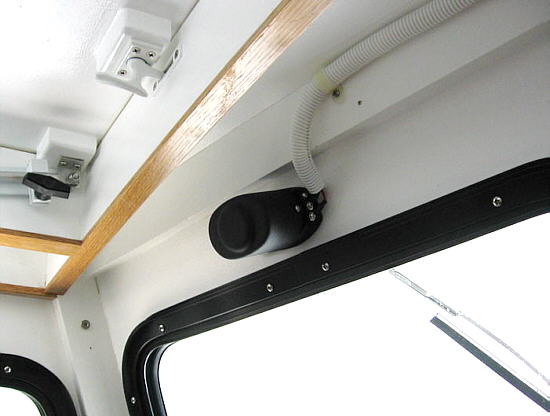
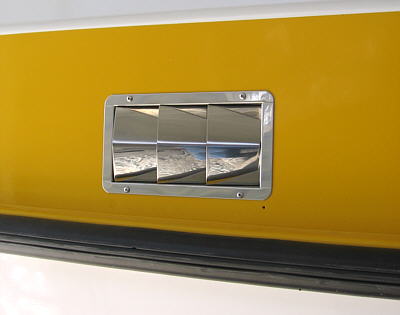
Power Storage Vent
One of my design
changes was to lengthen the cabin, as we wanted more living space.
As a result, the fuel tanks are located under the deck "inside" the
saloon. Knowing the dangers of gasoline fumes I built the two 40
gallon plastic tanks into a below the deck sealed chamber. They are
isolated from all electrical sources of spark and passively vented
through a vent grills on each side of the hull.
This seems to work
well when on the water but I had concerns about storage. Although
plastic fuel tanks hold the fuel they are not vapor proof (neither
or rubber fuel lines) and fumes will penetrate the tank and be
slowly be released into the surrounding air. While sitting in a
protected shed the passive ventilation would do little to expel
them. And even if the vapors did not reach an explosive level in the
chambers I was concerned the odor would leach up into the cabin and
make everything smell like gasoline.
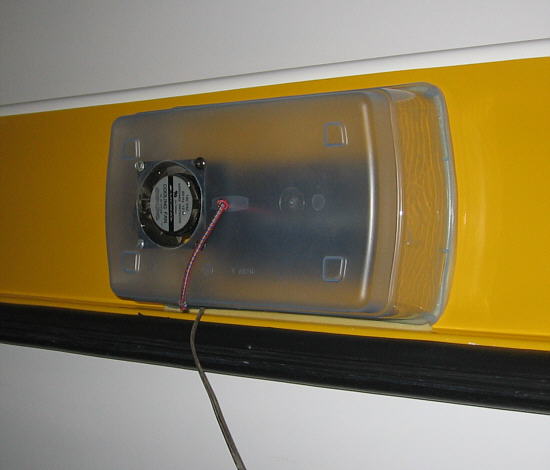
To prevent this I decided I needed a power vent that I
could attach when stored. I used a surplus brushless 12V-cooling
fan I had sitting in the shop. I mounted it in a plastic Wal-Mart
shoebox. On the edge if the box I attached foam weather stripping to
create a better seal and used a small bungee cord to hook it to the
grill. I plugged the power cord in to a timer set to run for 30
minutes and then shut off for about two hours. When on the trailer
in the shed I just plug this in and let it automatically exhaust the
fumes |
Automatic Charging Relay
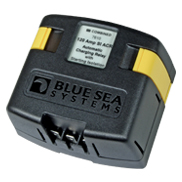 One of the challenges with a
boat of this type is maintaining charged batteries. I installed a 40-amp
charger that will run from shore power or the generator. It functions well
with fairly fast charge times. But on days when we are underway I wanted
to allow the outboard to handle these duties if possible. A little
research brought me to the Blue Seas SI-Series Automatic Charging Relay. When
installed it acts as a server sending the charge voltage where needed. For
example, when the outboard is running and has the starting battery at full
charge the relay will then sample the house battery to test it's
condition. If below a predetermined threshold it automatically transfers
power from the O/B to the house battery. An instrument panel light serves
as an indicator when the batteries are combined. The relay maintains the
higher voltage until the house bank is totally charged or the O/B is shut
down. When that occurs the relay opens and the two batteries are isolated.
This prevents the house load from depleting the starting battery. One of the challenges with a
boat of this type is maintaining charged batteries. I installed a 40-amp
charger that will run from shore power or the generator. It functions well
with fairly fast charge times. But on days when we are underway I wanted
to allow the outboard to handle these duties if possible. A little
research brought me to the Blue Seas SI-Series Automatic Charging Relay. When
installed it acts as a server sending the charge voltage where needed. For
example, when the outboard is running and has the starting battery at full
charge the relay will then sample the house battery to test it's
condition. If below a predetermined threshold it automatically transfers
power from the O/B to the house battery. An instrument panel light serves
as an indicator when the batteries are combined. The relay maintains the
higher voltage until the house bank is totally charged or the O/B is shut
down. When that occurs the relay opens and the two batteries are isolated.
This prevents the house load from depleting the starting battery.
But the relay is also
"bi-directional". When the engine is stopped and the shore power charger
is activated the above process is reversed. As the house bank is charged
the relay samples the starting battery. If the starting battery's
condition is low it will activate and charge it. This is a great feature
as one charger can manage two batteries and insure during storage all
batteries are kept at full charge. And this all occurs automatically and
requires no owner input.
We don't tend to use a
lot of power at night but do employ lighting and the LCD television for
several hours. So far, if we are running for four or five hours a day the
outboard is able to replenish our nighttime usage. The relay added about
$100 to the electrical system cost but for us it was a sound expenditure.
It goes a long way in helping manage battery charging.
|
|
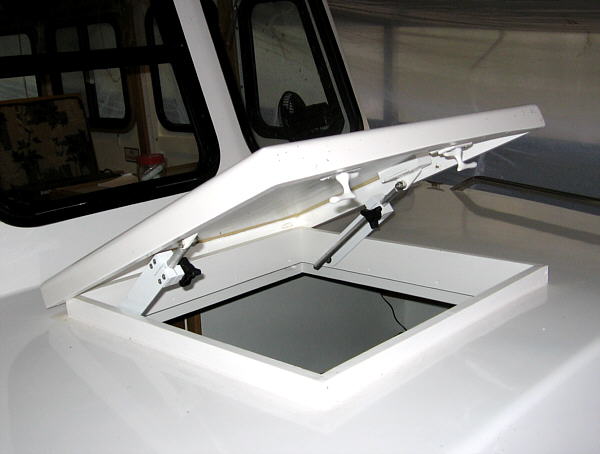
Hatches
When I
built the Cabin Skiff I installed a Bomar hatch in the berth top. I
admit it was one of their low-end plastic units that cost about $225
(in 1999) but assumed it would be serviceable.
In reality
it has been a continuous problem - it leaks. Not a lot but enough to
be very annoying dripping on your chest as you sleep. After removing
it and re-bedding it several times over the years I finally realized
the problem is with the design. When closed the gasket
built-in to the frame does not totally contact the hatch and will
allow rain to seep in.
Today you
can easily spend $600 on a medium quality hatch - and I needed
three. I find this price absolutely insane and decided just to
fabricate my own. If they leak I will be no worse off and still have
$1800 to spend on something else.
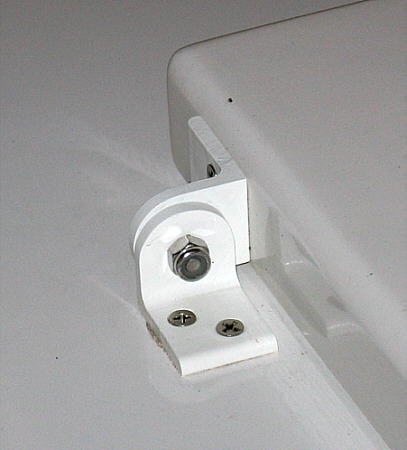
The hatch in the photo is on SeaQuinn's
berth top. I used 3/8" MDO for the top surface and white oak for the
frame. On the berth top surface I allowed a white oak "rim" to
protrude about 1 1/4" up. The sides of the hatch are sized to allow
the top of the hatch contact the rim when closed. Adding weather
striping between the two provides a good seal. Plus it is strong
enough I can stand on it without fear of
damage. |
|
The hinges were made from aluminum angle and uses a 1/4"
bolt as the pivot pin. This also allows the hatch to be removed
without disturbing the bedding of the attach screws. As an
experiment I "powder coated" the hinges white just to see how it
holds up. |
|
|
|
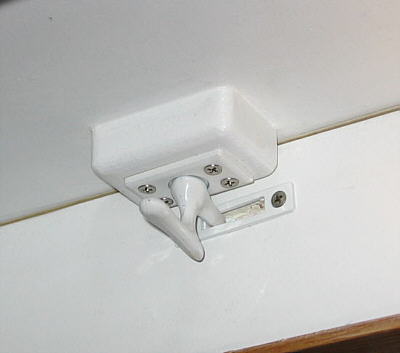
The hatches are held closed by a window sash latch form
Home Depot. These are cast from aluminum and seem strong enough to
handle the load. When installed correctly they pull the hatch down
when latched and enhance the weather stripping
seal. |
|
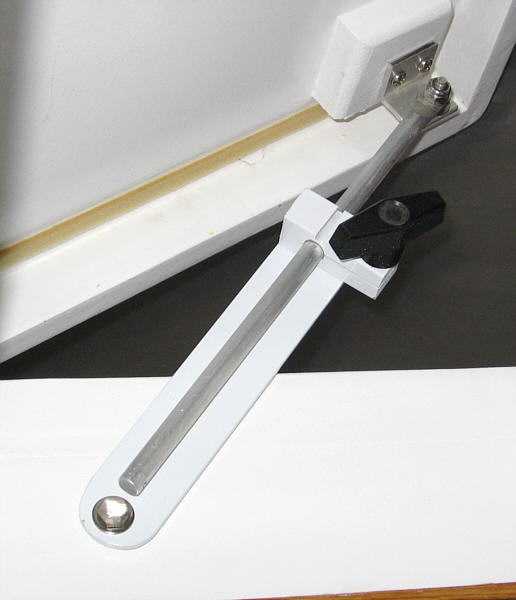
To hold
them open I fabricated sliding hatch adjusters from scrap aluminum
bar, round, angle and flat stock I had sitting around the shop.
I used standard threaded knobs to tighten a pinch block (made from
3/4" aluminum bar) and hold them in the desired position.
The foam weather stripping is the yellowish line on the inside of
the hatch. It was installed there rather than on the top
surface of the rim thinking it would be less susceptible to
damage.
For each hatch I had to buy the sash latches and the
threaded knob - the rest was fabricated from scrap. The total cost
per hatch was about $10 and none of them has leaked a
drop. |
|
|
|
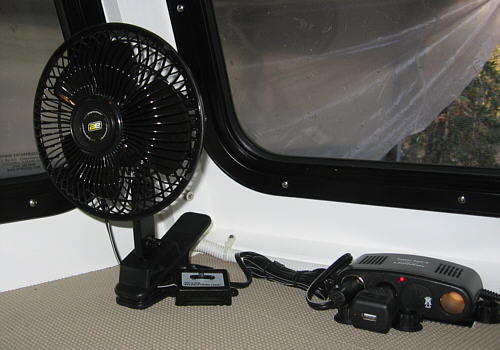
Fan
I added
this item to this list because I found it somewhat bazaar!
Without air conditioning fans become an important part of personal
comfort. I wanted to permanently install at least four (two in the
berth and one each at the helm and Admiral's seat) and perhaps two
more in the saloon. And like all things marine, fans sold for boat
use come at a premium price. Eventually I may go with the higher end
fans but for now I decided just to use standard automotive units. In
looking at these I was surprised at the limited selection
available. I decided to buy a couple at Wal-Mart - easy
to return if didn't like them.
For
$11 you can't expect much but it appears they are a reasonable
value. What I found interesting, when I was messing with mounting
one at the helm I swung the cord across the compass. The card
rotated. Since it wasn't plugged in I thought that odd. Fooled with
it a little more and found whenever the wire got near the compass
the heading changed. I grabbed one of the neodymium magnets I had
sitting there and it "stuck" to the insulated wire. Obviously the
wire used to connect this to the 12v source was made of steel! I
opened up the inline switch so I could see bare wire and it looked
like copper. Apparently, in order to reduce cost they have used
copper coated steel wire it this zip cord material. Maybe the stuff
is around but I have never heard of it before. Makes me wonder how
many other appliances and such are sold with what has to be very
inferior if not unsafe cords.
|
|
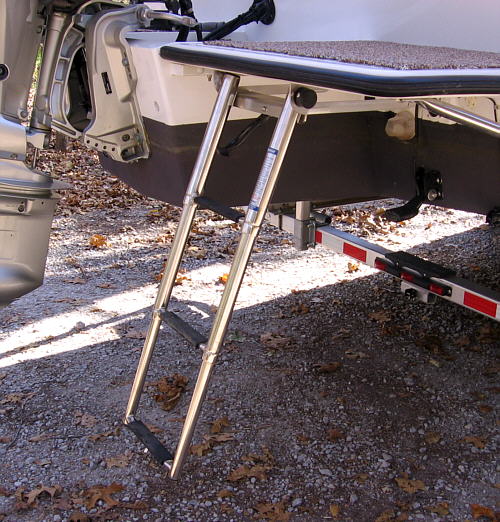
Swim Platform
Ladder
An
incidental item that has proven to be a good choice is the swim
platform ladder. We had added a commercial swim platform to our
former express cruiser and it came with ladder we liked very much.
For that reason I decided to add the same to SeaQuinn.
The
telescoping ladder stores completely out of the way under the
platform, which is nice because it is not a tripping hazard and
takes up no top space. We often enjoy just sitting back there
dangling our feet in the water and relaxing. Even when extended many
top mounted ladders tend to have protrusions make sitting difficult.
And although this unit is below the deck it is still easy to deploy
from above.
Another
added benefit is because of it length it works well for boarding
while on the trailer. The hull sits fairly high when under tow but
just dropping the ladder down allows us to climb aboard with minimal
fuss.
It is made
by Windline and is model SM-3XOC.
It retails for about $180 but as usual can often be purchased online
at a discount. But for us, even at full price, it is worth the
money. |
|
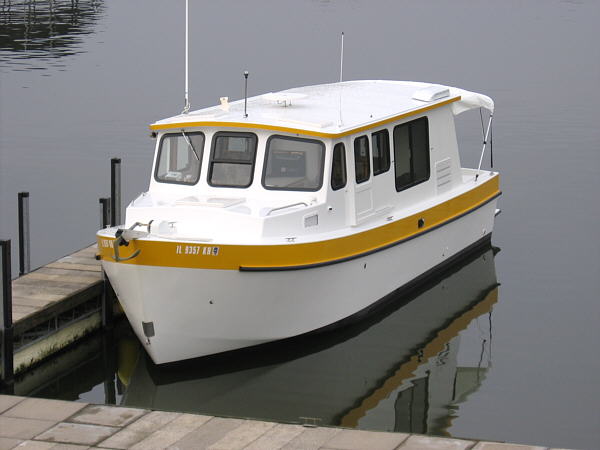
Final Thoughts
As I mentioned
at the beginning of this section our experience with the boat is still
somewhat limited. Ninety hours is not a lot of running time but combined
with 18 days of living onboard it has given us a taste of what lies ahead
- and we like it!
For me it has
opened up an entirely new type of cruising. With the Cabin Skiff it almost
always seems to be a race. I set a travel goal and then run hard to get to
the destination an often after just a short stay turn around and return.
Don't get me wrong I truly love doing this but I am finding there are
other ways to spend multiple days on the water.
With SeaQuinn
the experience becomes very laid back. The slow pace allows more time for
just relaxing. For example, little happens fast when going 7 MPH so the
Cabin Skiff's constant vigil of scanning the water ahead for debris is
greatly reduced. Also, because of the slower speed we tend to not have a
set destination. Our favorite cruising ground is Kentucky Lake / Barkley
Lake. We normally just drop the boat in and then say, "Where to?"
We just
cruise from marina to marina, stopping for a meal or just touring the
slips and looking at the wide variety of boats. Along the way we often run
close to the shore and look at the many beautiful lakeside homes. If it is
hot we may stop and swim for a while. It is not unusual to run 8 hours a
day but still not really go anywhere.
At the end of
the day we anchor out. Often we will sit in the open cockpit and read
while we watching the sunset and then move to the saloon and watch
something on television. If we are not in antenna reception range I have
my small netbook computer loaded with a selection of movies and we connect
it to the TV and watch.
One of the boats
features I think we enjoy the most is the shower. Nothing feels better at
the end of a hot day than a shower. With only six gallon of hot water we
can't take LONG showers but we have found it totally workable and have yet
to run out. Also, having a stocked refrigerator is nice too and not having
to worry about ice and coolers is a huge plus.
So I guess
you get the idea we are really enjoying the boat AND the different type of
cruising it brings. I had these goals in mind when I started the project
but had no guarantee how well the True Grit would fulfill them. Now the
jury is in and the verdict is SeaQuinn is guilty of exceeding my
expectations.
BACK
|