|
That statement exemplifies poor rationale for the planning. There are two things I should have recognized. First, since my intended use was for long distance cruising the need for some "extra" equipment should have been better explored. For example, I planned to use my handheld VHF radio not realizing its limited range would be a disadvantage when contacting lock masters. But even more than that I should have faced my known addiction to all things electronic. (As I type this there are SEVEN remote controls on the end table beside me!) The end result, is an 18' boat with a fixed AND handheld VHF radio, a fixed and handheld GPS, a fuel flow meter, a fishfinder (even though I don't fish), Bennet trim tabs with the auto leveling feature, and RADAR!
Obviously, I did not install a fuse block large enough to handle all of this stuff. And since each was added separately the easy solution was to just cobble more inline fuses on to the system. Plus I did not design enough space behind the instrument panel to allow all this to be installed in an orderly fashion. The result is a rat's nest of wiring with no logic or labels. The only plus in the entire mess is somehow it works and has given me little problems. But still it needs to be completely amputated and reinstalled - someday.
I promised myself when building the True Grit the wiring was going to be done properly and I have been working to that end. Some suggest a good way to start is to draw out a plan and although I didn't actually use a pen and paper I spent quite a few hours just thinking through what need to be accomplished. (Everyone that has laid in bed at night mentally sorting through boatbuilding problems instead of sleeping - raise your hand.) In a boat this size with the equipment I intend on installing this is no small task. The first order of business was to develop a list of electrical items and breakers/fuses.
12 VOLT
SYSTEM Nav &
Anchor Light Radar GPS Sounders Radio Instruments Fuel
Flow Lights cabin Lights
berth Lights
exterior Spot
Light AM/FM
Radio 12V Outlets (6) TV &
Antenna Water
Pump Bilge Pump
(2) Propane
Alarm Horn Fans /
Blowers (3) Wipers Circulating
Fans (4) SWITCHES Bilge Pump
(2) Nav
Lights Anchor
Light Instruments
Light Water
Pump Horn Fans /
Blowers (3) Wipers 120V
BREAKERS Refrig Charger Outlets
(3) Water
Heater AC
(?) Microwave Generator
I then needed to decide on what type of breakers or fuses to use and where they would be located. For the 120V system I used conventional marine breakers but for the 12V system I decided on automotive type ATO/ATC fuses. The reason was two fold. One is cost as I knew I would need between 25 and 30 breakers and then there was also the space needed to mount all of them. The ATO panels are much less expensive and yield a greatly reduced footprint. Plus, my Bayliner 2452 used ATO fuses and I have seen them in several other boats as well. Just made sense to me. I ordered two fuse blocks below giving me a total of 28 circuits.
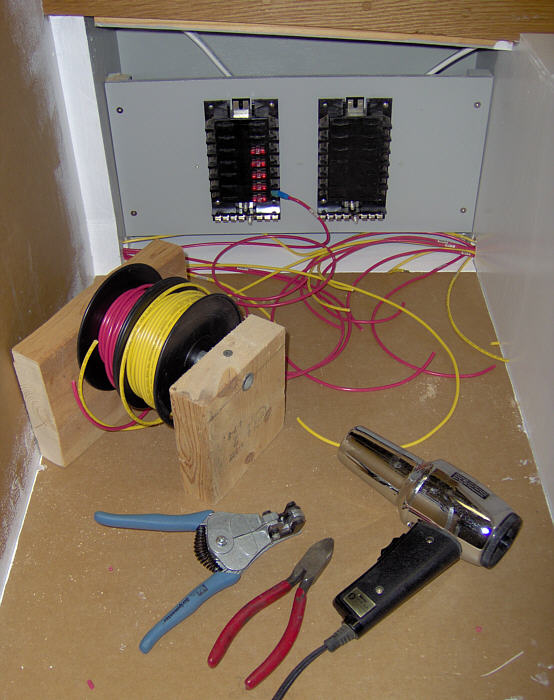
With things fairly well thought through and the placement of the breaker/fuse panels decided it was time to start pulling and hiding wire. Do not underestimate the physical demands this will require - crawling in, reaching up, reaching under, kneeling down, laying down, wiggling in - I found myself in the most uncomfortable and cramped positions imaginable and my 57 year old body screamed in protest. As of this writing I am about 60 percent complete but the worse part is behind.
Although I didn't start out with a drawing of my wiring plan I thought it a good idea to put something together for future reference. Above is sketch of part of the 12 volt side and is a work in progress. The colored wire lines are for clarity as most wires are actually red and yellow. The devices are shown in their aproximate locations over the ghosted floor plan outline.
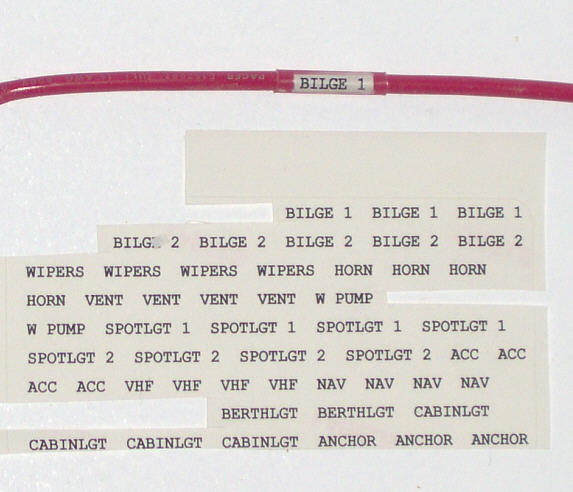
One final item is wire identification. I decided early on every wire would be labeled but need a method to accomplish it. There are numerous schemes including self sealing labels that can be printed with a computer printer and then wrapped around the wire. But for me most were too expensive for my low volume needs. I decided on using clear heat shrink tubing and cheap label paper. My technique was to use the computer to print the name on standard 8 1/2" x 11" label sheets - like Avery return address labels available at Wal-Mart or office supply stores. I would then use scissors to cut out the name and attach it to the wire. The self-stick backing is just used to hold it in place for the moment. Then I slide a piece of clear heat shrink tubing over it and shrink it using a heat gun. And remember there should be a label at each end of the wire AND each circuit has two wires so four of each label is needed.
Here is a photo of a #14 wire with 1/4" 3:1 double wall clear heat shrink and the text printed in 9 point. Below the wire is the label stock with items cut out. I am pleased with the result. It is a little bit of a hassle cutting out the text and peeling off the backing but overall I feel a workable and economical solution.
|
 Looking back on building my
Cabin Skiff my one major regret is the electrical system. The cause of the
problem is multi-faceted. My intentions were good but here I exhibited
poor planning and execution that was mediocre at best.
Looking back on building my
Cabin Skiff my one major regret is the electrical system. The cause of the
problem is multi-faceted. My intentions were good but here I exhibited
poor planning and execution that was mediocre at best.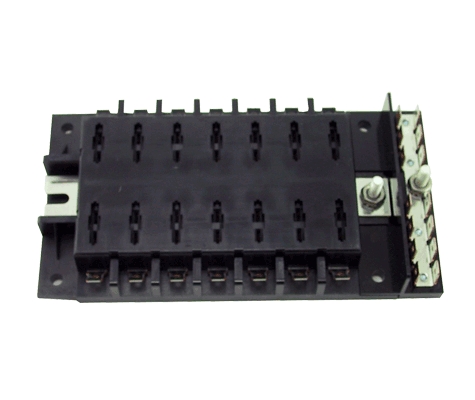 Once I had the list of equipment it was
time to try to decide where it would all be placed. In doing this I needed
to address wire routing, as I wanted to hide as much of it as possible. At
some places like the cabin walls and ceiling it has to be exposed (no
double wall construction to hide it within) but I wanted to hold these to
a minimum. Also since some of the wire would be exposed the surface needed
to be finished and painted before the wiring could begin. So I had to go
ahead and paint most of the interior knowing some of it is going to get
beat up in the considerable construction still
remaining.
Once I had the list of equipment it was
time to try to decide where it would all be placed. In doing this I needed
to address wire routing, as I wanted to hide as much of it as possible. At
some places like the cabin walls and ceiling it has to be exposed (no
double wall construction to hide it within) but I wanted to hold these to
a minimum. Also since some of the wire would be exposed the surface needed
to be finished and painted before the wiring could begin. So I had to go
ahead and paint most of the interior knowing some of it is going to get
beat up in the considerable construction still
remaining.